Iridium Edge Quick Installation Guide #
[/vc_column_text][vc_separator el_width=”30″][vc_column_text]If you need any help with your initial install of your Iridium Edge from Iridium then you are in the right spot! The Iridium Edge Quick Installation Guide will help you starting out with your new piece of equipment. If you are still having issues please feel free to call Apollo SatCom: Apollo SatCom Contact
[/vc_column_text][/vc_column][/vc_row][/vc_section][vc_section][vc_row][vc_column][vc_column_text]Step 1 – Record Your IMEI NumberBefore installation, the Iridium Edge’s IMEI number must be recorded along with the installation location. The Iridium Edge’s IMEI number is the network address for the Iridium Edge and it is used for provisioning, billing, and to send or receive messages to and from the device. It is located on the bottom of the Iridium Edge.
[/vc_column_text][/vc_column][/vc_row][vc_row][vc_column][vc_column_text]Step 2 – Select a Mounting LocationThe mounting location is critical to ensure a safe installation and reliable operation. The installer should consider the following guidelines:
- The location must provide a safe and secure installation
- Select a flat, horizontal mounting location for optimal uniform satellite performance
- Make sure that the mounting location provides a clear unobstructed 360° view of the sky in all directions. Typically, a mounting location on top of an asset provides the best performance
Iridium Edge can be mounted in three methods as shown:
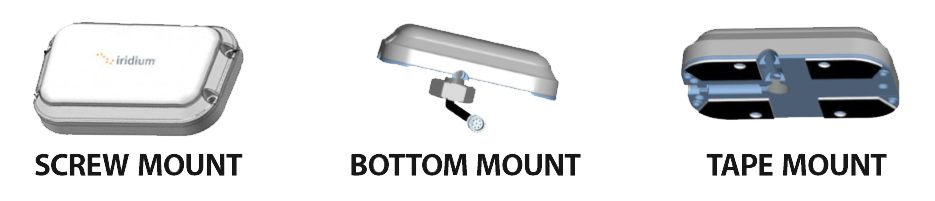
Note: The Accessory Bag that comes with Iridium Edge is only required for the Bottom Mount installation.[/vc_column_text][/vc_column][/vc_row][vc_row][vc_column][vc_column_text]Step 3.2 – Screw Mount Installation
Iridium Edge Quick Installation Guide; Iridium Edge is designed to be mounted with four M4 screws. Hardware must be provided by the Installer.
- Drill four (4 mm) holes in the mounting surface and/or the bracket that secures Iridium Edge
- Select a side channel for the cable to exit, depending on cable routing and installation restrictions – remove the aesthetic grey plug from the selected channel by gently prying it out with a sharp flat head screw driver – if the plug needs to be re-inserted, ensure the plug is flat to the baseplate before pressing in with your thumb – do not use any instruments to re-insert
- Firmly press the pigtail cable into the selected channel, making sure that the cable is flush with the baseplate – do not use any sharp instruments
- In the event that the pigtail cable must be removed from the side channels, carefully remove the cable with your thumb firmly over cable and baseplate – gently pry the pigtail cable – do not yank the pigtail
- If the aesthetic grey plug is not used, optionally fill the unused side channel with silicon sealant to hide the exiting center cable
- Secure all mounting nuts with a thread locker that is appropriate for the installation
In the bottom mount configuration, Iridium Edge is held in place with a single screw. The items in the Accessory Bag are required for this type of installation.
- Drill a single 15mm hole at the desired location for Iridium Edge – ensure that the surface is flat to avoid water ingress under Iridium Edge
- Insert the slotted screw into Iridium Edge baseplate and screw until finger tight
- Carefully press the rubber grommet into the baseplate until it is flush with Iridium Edge
- Optionally fill the two side channels with silicon sealant, taking care that it does not unseat the grommet
- Mount Iridium Edge and drop the pigtail connector through the drilled hole
- Place the slotted nut over the pigtail cable on the cable above the pigtail’s top heat shrink such that the wide side of the tapered slotted nut goes over the cable first
- Tighten the slotted nut into the slotted screw the slotted nut should be tightened sufficiently to compress the rubber grommet and to prevent water from getting under Iridium Edge and then down inside of the installation – do not exceed a 5N-m when tightening the slotted nut
- Unwind the spiral sheath and wrap it around the pigtail so that is inside the slotted screw and flush to the Iridium Edge’s baseplate to protect against chaffing
- Ensure that the Iridium Edge pigtail cable is strain relieved, especially if a cable is suspended from the connector
The tape mount is for a permanent installation. Do not use it for evaluation or application testing.
- The Accessory Bag contents aren’t required for a Side Mount installation – these can be set aside
- Do not tape Iridium Edge to the mounting surface until the mating cable is successfully installed and Iridium Edge is operating correctly
- Ensure that the mounting location is clean and smooth, without any surface abrasion
- Install the Iridium Edge mating cables, test the installation & the Iridium Edge performance
- Verify that the Iridium Edge pigtail cable is securely pressed into the baseplate
- Mark the location and corners for the desired location of Iridium Edge
- Clean the mounting surface with rubbing alcohol – the surface must be clean
- Remove the red plastic tabs covering the Iridium Edge’s double side
- Carefully press Iridium Edge on the marked location
Once a mounting location is determined, follow the guidelines below when installing the cable:
- Only use cables from an Iridium Service Provider that meet the specifications in the Iridium Edge User Manual
- Ensure that Iridium Edge is connected to the power source through a quick tripping fuse – the fuse should be located close to the power source
- Secure all cables including the Iridium Edge’s pigtail cable
- Screw the mating cable onto Iridium Edge so that it is finger tight – do not use a wrench to tighten the mating cable to Iridium Edge
Important Safety Information #
Warnings – Read All Warnings
Prior to using the Iridium Edge, you must ensure that you read and understand the User Manual including the safety warnings and information. Failure to do so could result in serious injury or death.[/vc_column_text][/vc_column][/vc_row][vc_row][vc_column][vc_column_text]Installation – Warning
Always secure power cables. Failure to secure cables could result in fraying or failure of the power cable, resulting in fire and or failure of the device. These hazards could cause serious injury or death.[/vc_column_text][vc_column_text]Installation – Caution
Install the Iridium Edge safely and securely. Failure to do so could result in dislodging of the Iridium Edge, especially when operating in areas of high winds or when mounted on moving vehicles, which could result in injury or damage.[/vc_column_text][/vc_column][/vc_row][vc_row][vc_column][vc_column_text]Ground – Warning
Properly ground the Iridium Edge. Failure to ground the Iridium Edge could result in unexpected currents, which could cause serious injury or death.[/vc_column_text][/vc_column][/vc_row][vc_row][vc_column][vc_column_text]
Power Cables
#
Use proper cables that have been supplied by a Service Provider. Use of improper cables can result in damages to equipment, property, or persons.
Warning – Use power and ground conductors of proper gauge. Use of improper gauge power cables could result in exposing cables to excessive heat which could cause fire, resulting in serious injury or death.
Caution – Use only molded back shell IP67 connector with Iridium Edge. Failure to do so could create an improper seal, allowing moisture and water vapor to enter the Iridium Edge’s pigtail which in turn could lead to corrosion and damage to the device, resulting in injury or damage.[/vc_column_text][/vc_column][/vc_row][vc_row][vc_column][vc_column_text]Explosive Atmosphere/Blasting Areas Warning – Power down or turn off the Iridium Edge when in a “blasting area” or in areas marked as: “Turn off two-way radio.” Obey all signs and instructions. Failure to do so could result in serious injury or death.
Explosive Atmosphere/Blasting Areas Warning – Turn your device OFF when you are in any area with a potentially explosive atmosphere. Obey all signs and instructions. Sparks from your device in such areas could cause an explosion or fire resulting in serious injury or death.[/vc_column_text][/vc_column][/vc_row][vc_row][vc_column][vc_column_text]Pacemaker Warning
- Should ALWAYS keep Iridium Edge more than eight inches away from their pacemaker when it is turned ON
- Should turn Iridium Edge OFF immediately if there is any reason to suspect that interference is taking place
- Failure to heed this warning could result in serious injury or death
The Iridium Edge must be powered through a fuse or current limited power supply. Failure to do so could cause large current draws if unexpected or inadvertent shorts occur in either Iridium Edge device or in its mating cable. Any large sustained current could result in damage to equipment or in persons.[/vc_column_text][/vc_column][/vc_row][vc_row][vc_column][vc_column_text]Regulatory – Aircraft
Iridium Edge Quick Installation Guide: The Iridium Edge has not been qualified or tested for operation in aircraft. In the United States, use of the device is subject to regulation including 47 C.F.R. 25.285(a) governing use of the device only by the pilot or with pilot consent. Learn about all of the rules, regulations and laws governing your use of the device before attempting to use on an aircraft.[/vc_column_text][/vc_column][/vc_row][/vc_section][vc_section][vc_row][vc_column][vc_column_text]
What’s in the Box? #
 [/vc_column_text][/vc_column][/vc_row][/vc_section]


