- SkyLink Device Help Five Parts
- Part 1: Connecting to Device WiFi
- SkyLink Device Interface & Cloud Services Portal
- Troubleshooting
- Part 2: Change Credentials
- Changing Device Name & WiFi Password
- Editing Your Personal & Org Contact Info
- Connecting to the Internet
- Part 3: Making Calls
- Part 4: SkyLink Cloud Services Account Create and Assign Device & Voice Profiles
- Creating Profiles
- Assigning Profiles
- Part 5: Creating Advanced Firewall Rules
- Viewing Profiles
SkyLink Device Help Five Parts #
Part 1: Connecting to Device WiFi #
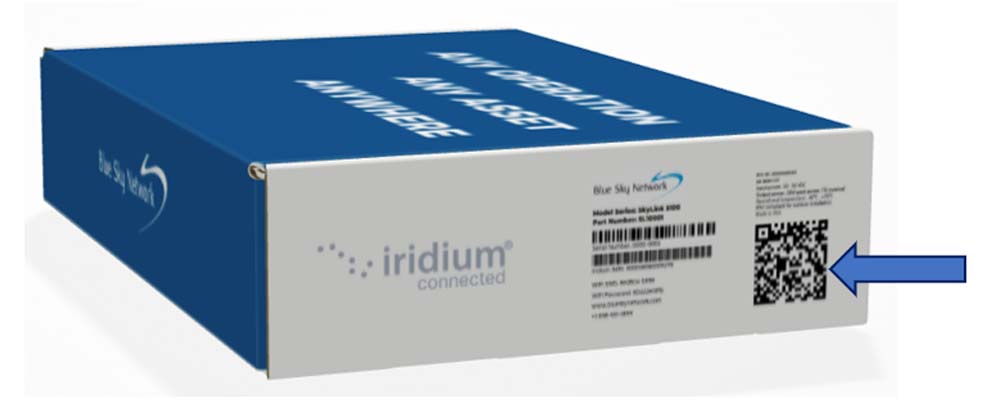
A label containing a QR code with a WiFi access point can be found on both the box of your SkyLink Data Gateway and on the back panel of the device itself. Quick Tip: We recommend using a wide-screen device (e.g., laptop, PC, or tablet) for the initial configuration and use the SkyLink Device Help article for assisstance.
After properly installing and powering on the device, you can connect to WiFi through one of two ways:
- Use a mobile device or tablet to scan the QR code. Your phone/tablet will then be automatically connected to the WiFi. Quick Tip: If using a cellular device, it may be helpful to first switch into airplane mode before connecting to the SkyLink WiFi
- Use the WiFi SSID and password found on the label
If using an Ethernet cable with your SkyLink device, simply plug the cable into the appropriate power source (e.g., a wall) and your device will automatically be configured via DHCP.
SkyLink Device Interface & Cloud Services Portal #
The SkyLink ecosystem leverages two platforms for seamless device management and configuration.
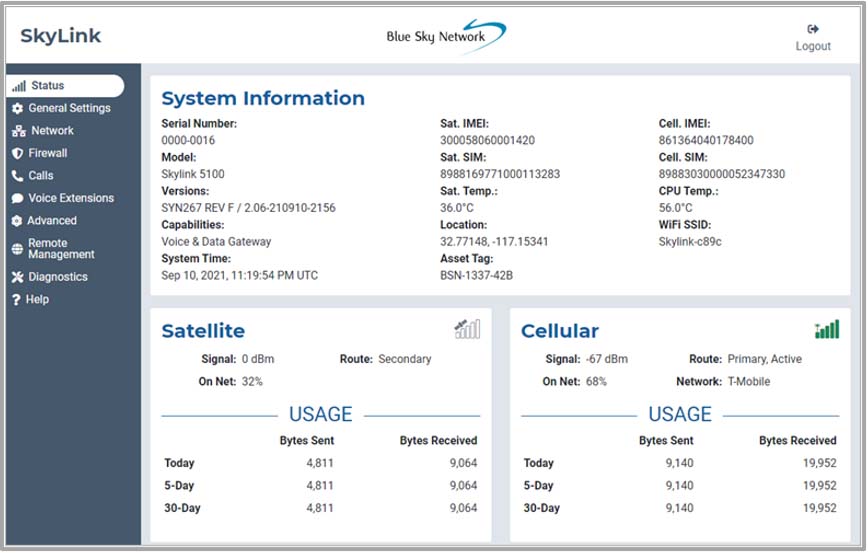
- Device Interface (pictured first) – Use when you would like to view or make changes to a single device. Log in by connecting to device WiFi and typing in the SkyLink IP address: 192.168.111.1Default login and password is ‘admin’
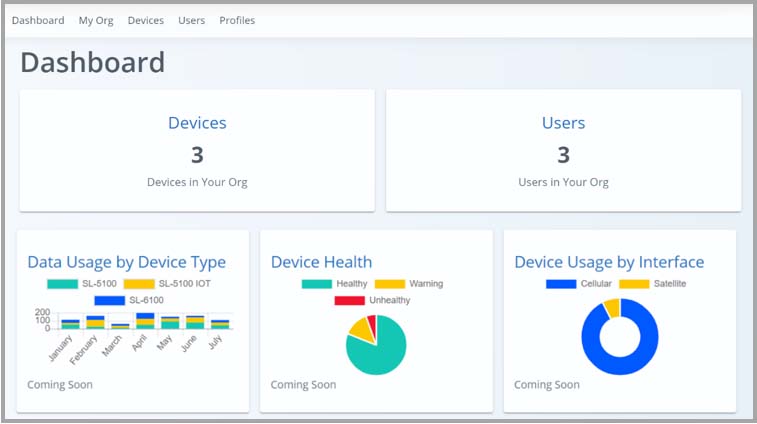
Upon logging in, you will automatically be directed to the Status screen. - Cloud Services Portal (pictured second) – Use to manage and configure a fleet of devices. Log in by opening a web browser and typing in the SkyLink Cloud Services URL: https://portal.skylink.net/loginLogin information will be sent to you via email
Upon logging in, you will automatically be directed to the Dashboard screen.
Troubleshooting #
Via Hardware #
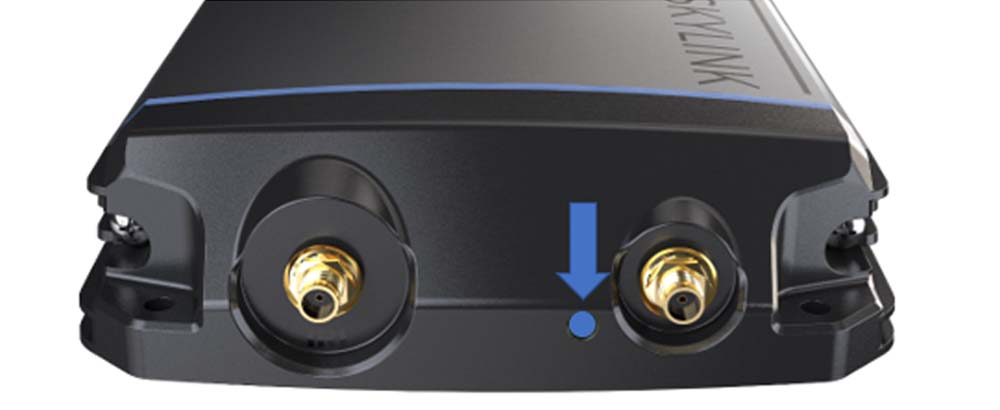
The top panel of your device contains a power LED indicator that cycles through multiple colors as it loads. A steady blue light indicates that the device is ready to be used.
If the power LED indicator continues to display a steady red light, please see our SkyLink Install Guide to help you diagnose the problem. If you are unable to resolve your system issues, please contact us for technical support.
To learn more about the power LED indicator colors, see the SkyLink Install Guide.
Via Software #
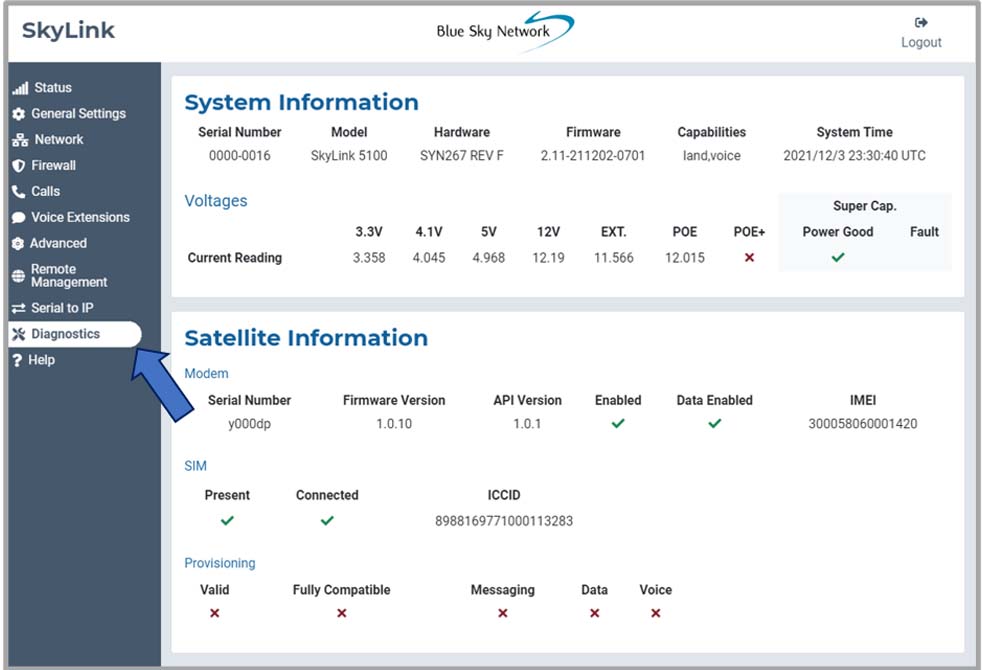
In the SkyLink Device Interface, navigate to the Diagnostics screen and use the following sections to help you diagnose hardware & system issues:
- System Information – Provides data that you may be asked for in the event that you report a technical issue to our support team. A red ‘x’ under Fault in the supercapacitor (Super Cap.) column indicates a power fault in the unit.
- Satellite and Cellular Information – Use the check marks in these sections to verify that both capabilities are enabled.
- Network Troubleshooting – The Operations drop-down menu allows you to perform pings and trace routing. Press ‘Execute’ to apply configurations.
- System Log – Used by the BSN support team for diagnostic purposes.
Part 2: Change Credentials #
Changing Device Name & WiFi Password #
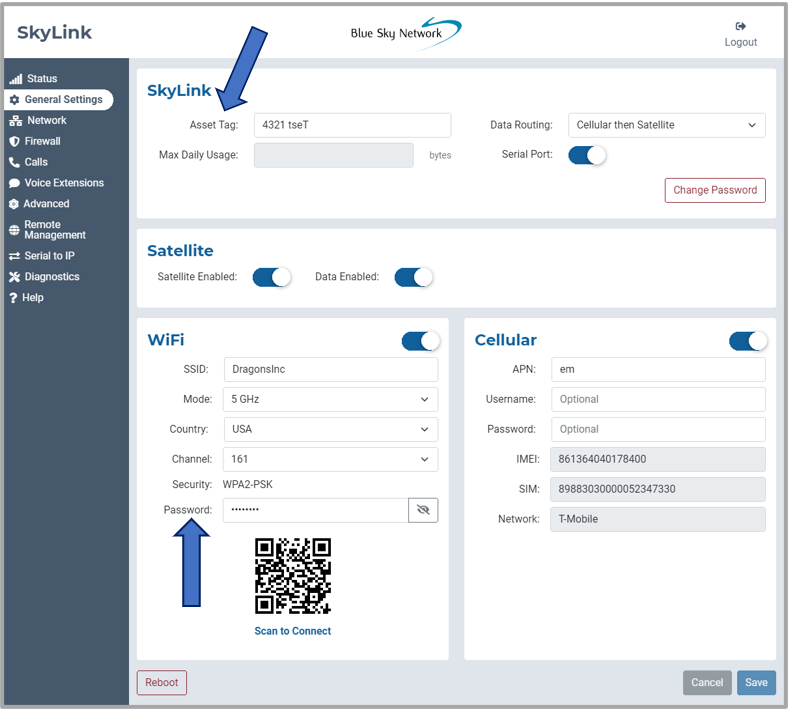
Navigate to the General Settings screen in the SkyLink Device Interface. Under the section labeled SkyLink, use the Asset Tag field to type in the desired device name.
Under the WiFi section, type your desired password in the Password field and press ‘Save.’ You can then scan the QR code to re-connect to device WiFi.
Quick Tip: If you are making changes to a fleet of devices, save time by using the SkyLink Cloud Services portal (see yesterday’s SkyLink Academy session for the difference between the SkyLink Device Interface and Cloud Services portal).
Editing Your Personal & Org Contact Info #
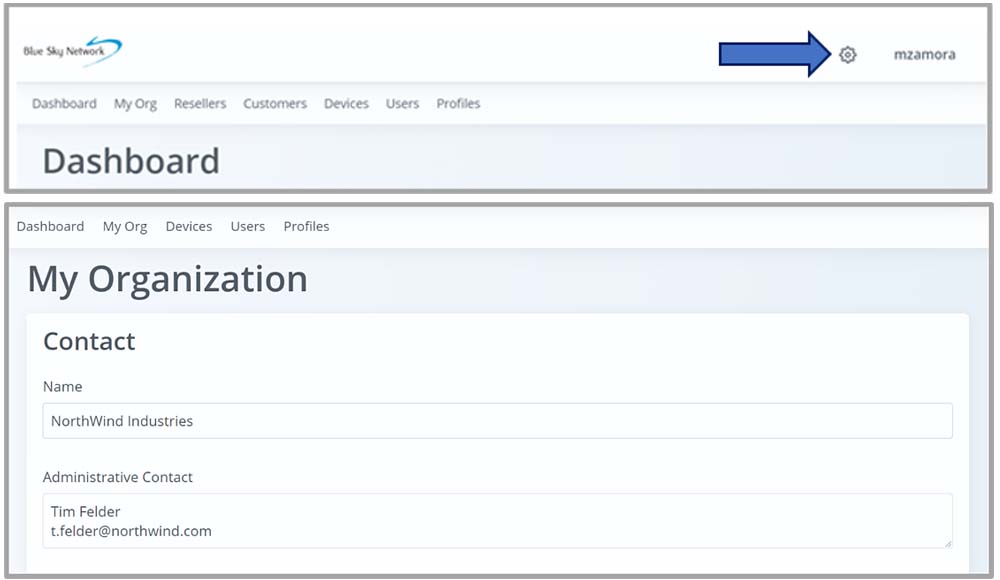
Log in to your SkyLink Cloud Services account. To edit your contact information, press the gray wheel icon located in the upper right-hand corner of each screen (pictured first). Complete the desired fields, then press the ‘Save’ button.
To edit your organization’s name or the contact information for your org’s admin and support personnel, navigate to the My Org screen (pictured second). Edit the desired fields and press ‘Save.’
Please Note: that only admin accounts have the ability to update their organization’s information.
Connecting to the Internet #
To connect to the internet via your SkyLink device, first ensure that:
- You have properly installed your activated Iridium and cellular SIM cards.
- You have connected the LTE antenna or an Iridium-approved antenna to the SkyLink device.
- You are connected to the SkyLink device WiFi or are using an ethernet cable (see yesterday’s SkyLink Academy session for more information).
- Satellite or cellular capabilities have been enabled via the toggle buttons on the General Settings screen of the SkyLink Web Interface.
You are now able to use your personal device to browse the Internet and use mobile applications!
Additional Resources – The SkyLink Install Guide contains a full list of Iridium-approved antennas.
Part 3: Making Calls #
The SkyLink unit supports 2 phone lines and a network connection that accepts SIP, providing users with multiple voice options. Each option offers 2 Iridium inbound and outbound lines. POTS customers also have FXS and FXO options to choose from.
Before making a phone call, ensure the following is completed:
- You have properly installed your activated Iridium SIM card.
- You have connected an Iridium-approved antenna to the SkyLink device.
- You have enabled satellite capability by navigating to the General Settings screen on the SkyLink Web Interface and sliding the left-hand toggle button.
You are now able to make inbound/outbound calls via your landline phone or personal device, including third-party apps on computers, smartphones, or tablets!
Quick Tip: Use the Voice Extensions screen on the SkyLink Device Interface to configure line extensions and the Calls screen to view call details.
Additional Resources
- Please see the SkyLink Install Guide for detailed information on installing the SIM card and antennas.
- See the SkyLink User Guide for tips on how to optimize SIP phone apps.
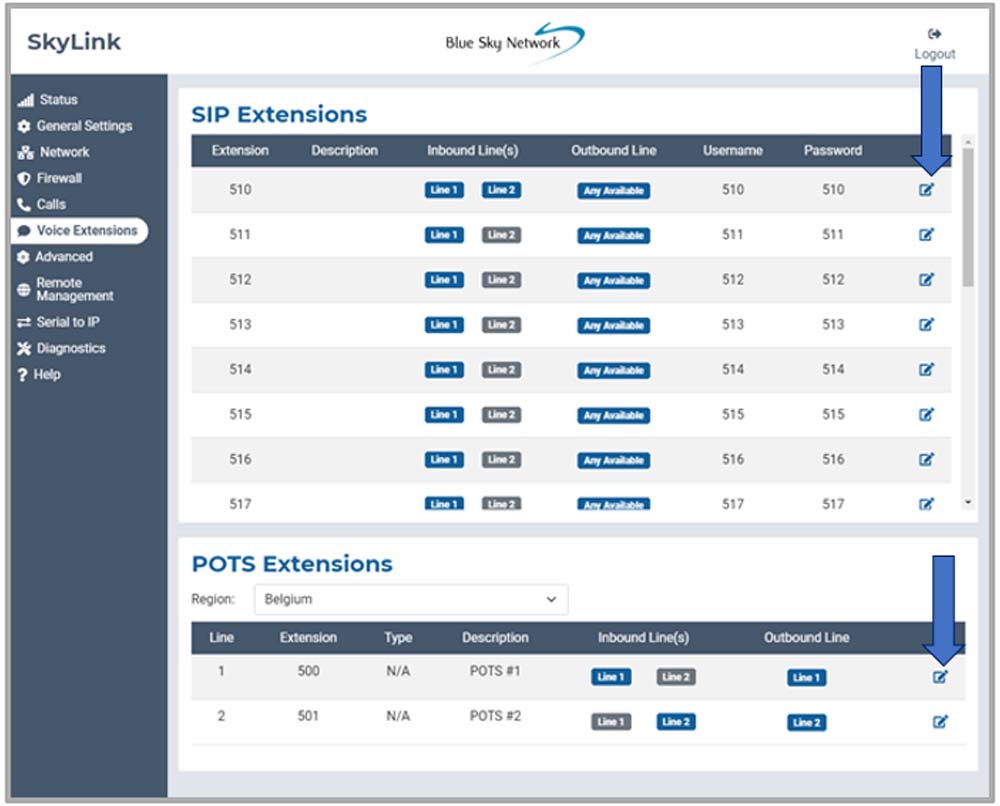
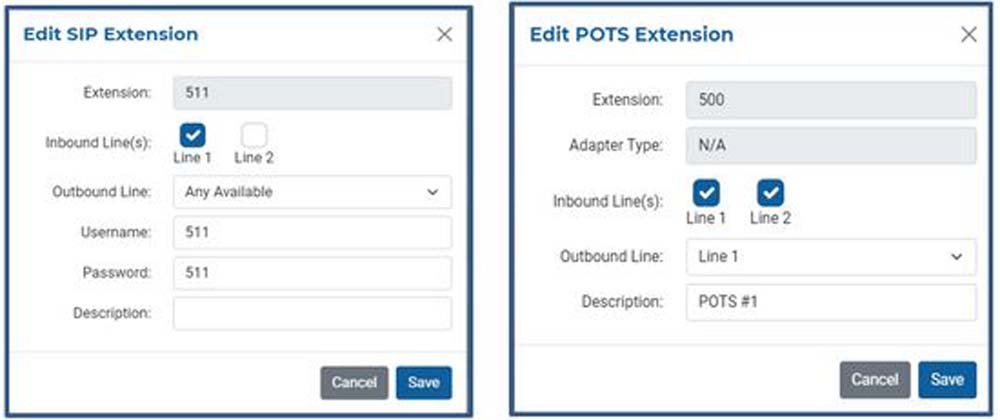
Navigate to the Voice Extensions screen in the SkyLink Device Interface (pictured first). Click the pencil icon next to the SIP or POTS extension that you would like to edit. A pop-up window (pictured second) will appear, allowing you to complete several fields:
- Under Inbound Line(s), tick each box to allow calls to both Line 1 and Line 2. Deselect both lines to block calls from ringing to an extension. Quick Tip: If you are not receiving calls to your extension, ensure one or both lines are selected here.
- Under Outbound Line, choose whether Line 1, Line 2, or Any Available line can be used when making a phone call from this extension. A scenario for only selecting one line would be a ship captain who has Line 1 reserved, and the crew uses Line 2.
Add a description for each line if desired, then press ‘Save’ to apply changes.
Quick Tip: Selecting only Line 1 or Line 2 in the Inbound Line(s) field along with the Any Available option in the Outbound Line field may cause issues when returning calls. For example, if only Inbound Line 1 is selected and you dial on Any Available Outbound Line, you may dial out on Line 2; this would leave someone unable to return your call.
Part 4: SkyLink Cloud Services Account
Create and Assign Device & Voice Profiles #
Creating Profiles #
SkyLink Cloud Services enables you to remotely create and store device & voice profiles that match your use cases for terminals in the field. For example, you can create certain profiles for your IoT devices and a different set for your vehicle units.
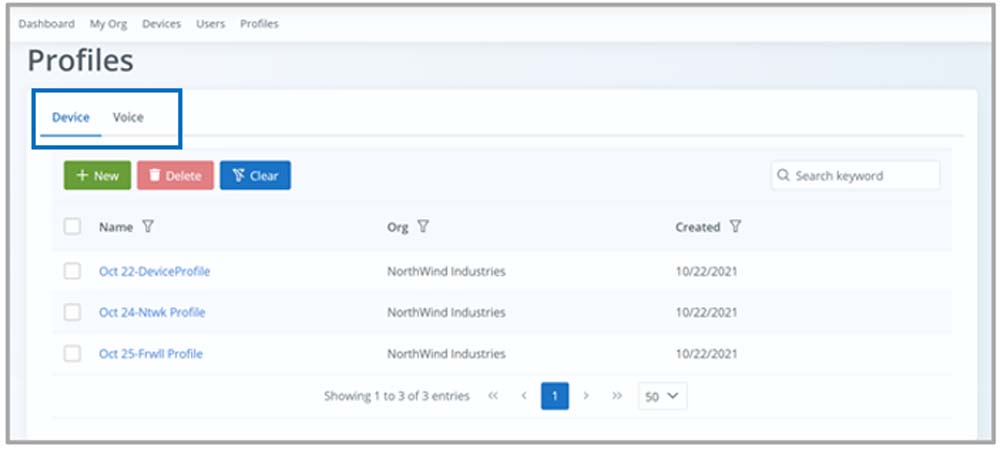
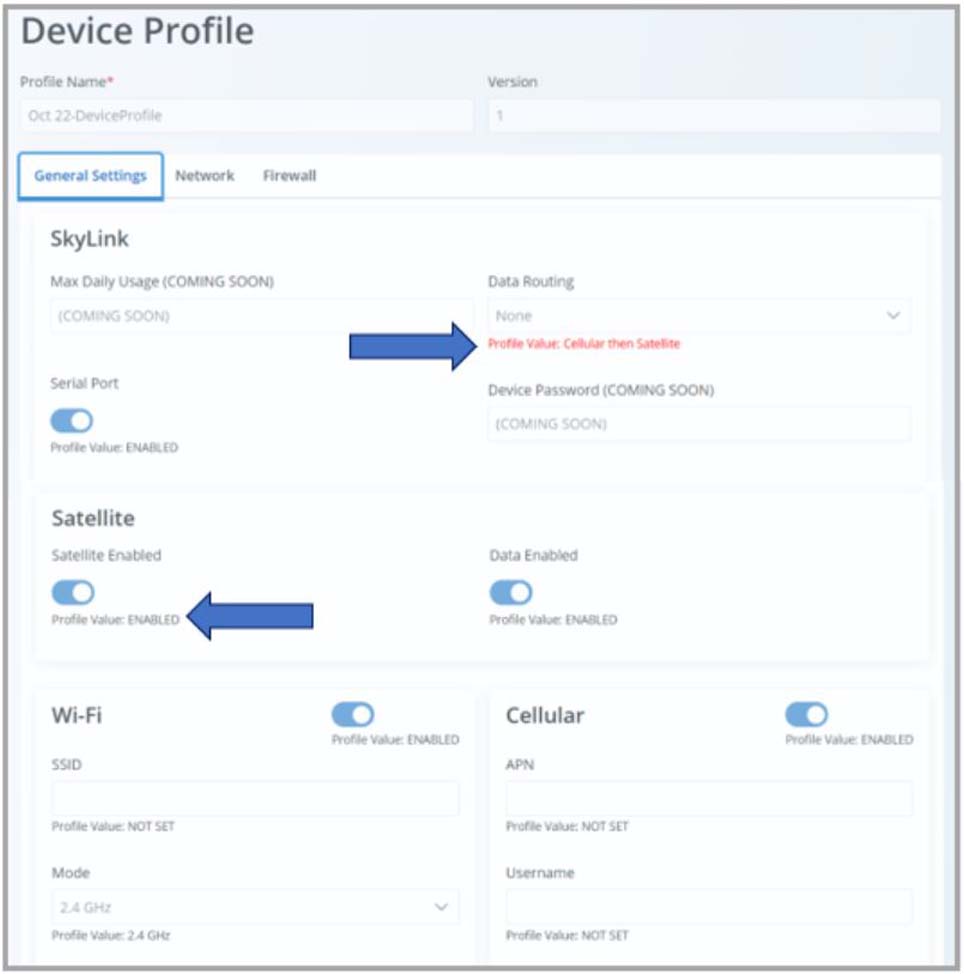
To create a device profile, navigate to the Profiles screen in the SkyLink Cloud Services portal. Press the ‘New’ button to be directed to the Add Device Profile screen, which has the following 3 tabs:
- General Settings – Allows you to make configurations related to the device’s data usage and ID information. Several fields such as Data Routing, Mode, and Security contain drop-down menus for additional customization. Use the toggle buttons under the Serial Port, Satellite, Wi-Fi, and Cellular fields to enable or disable connectivity.
- Network – Enables you to input LAN and DHCP Server info into the fields. Select a Network Mask and Lease Validity date from each field’s drop-down menus for further customization.
- Firewall – Here you can use the drop-down menu to choose between sets of predefined rules (referred to as Firewall Profiles) that enable or disable common network traffic. Press ‘Save’ to apply the profile.
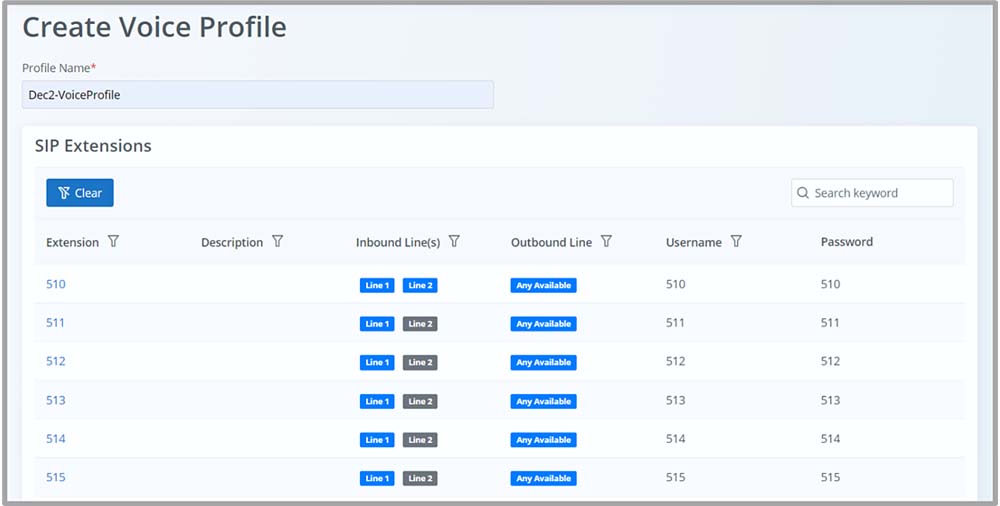
There are 20 SIP and 2 POTS extensions that can be configured. To create a voice profile, click on the Voice tab and then press ‘New’ to be directed to the Create Voice Profile screen. There you will see 2 sections you can configure:
- SIP Extensions – Click on a SIP Extension to edit its Extension, Inbound/Outbound Line(s), Username, and Password fields. You can also provide a description in the last field. Press ‘Save’ to apply changes.
- POTS Extensions – Use the drop-down menu to select region-specific dial tones, ringing tones, etc. Click on an extension to make edits.
Assigning Profiles #
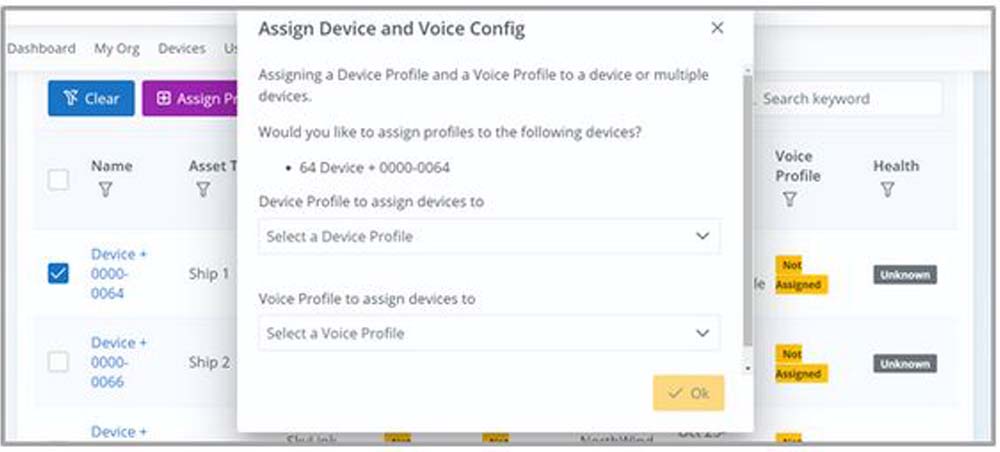
In the SkyLink Cloud Services portal, navigate to the Devices screen. To assign a device or voice profile to a unit, select the desired device(s), then use the drop-down menu from the pop-up window to make your profile selections. Press ‘Ok.’
Part 5: Creating Advanced Firewall Rules #
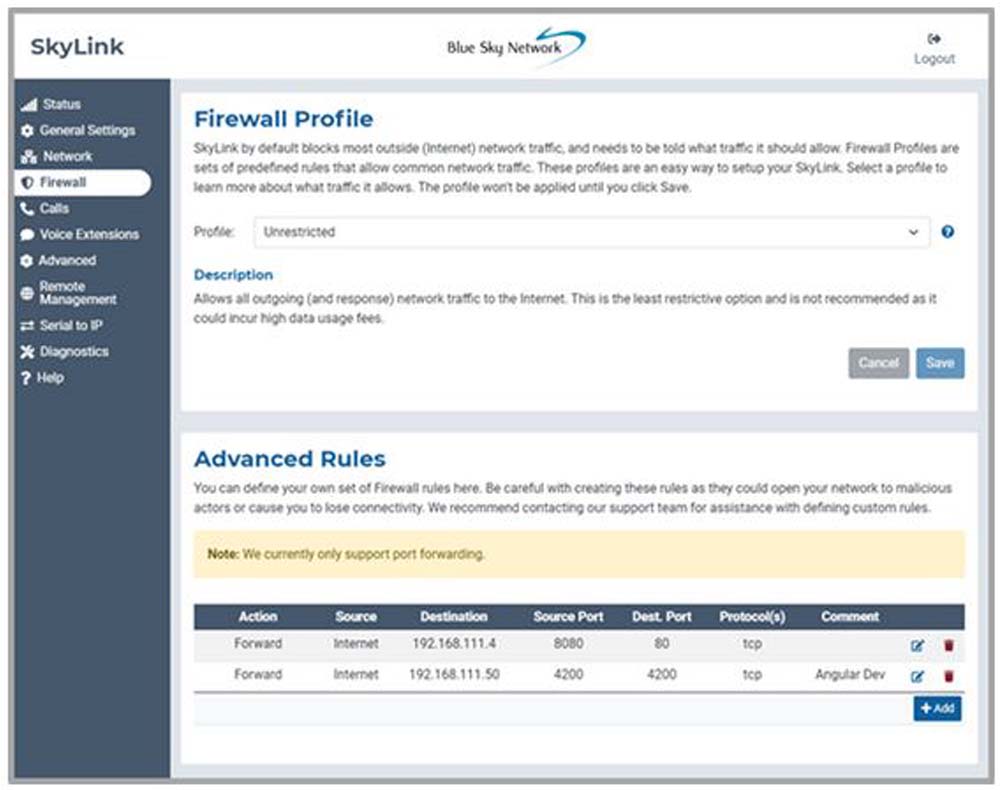
Firewall Profiles allow you to enable or disable applications from connecting to the internet by either choosing from a compiled list of predefined rules or by creating your own set (referred to as Advanced Rules).
In the SkyLink Device Interface, navigate to the Advanced Rules section on the Firewall screen. Press the ‘Add’ button to create a new advanced rule.
Quick Tip: Use the SkyLink Online Portal to apply custom rules to a fleet of SkyLink devices.
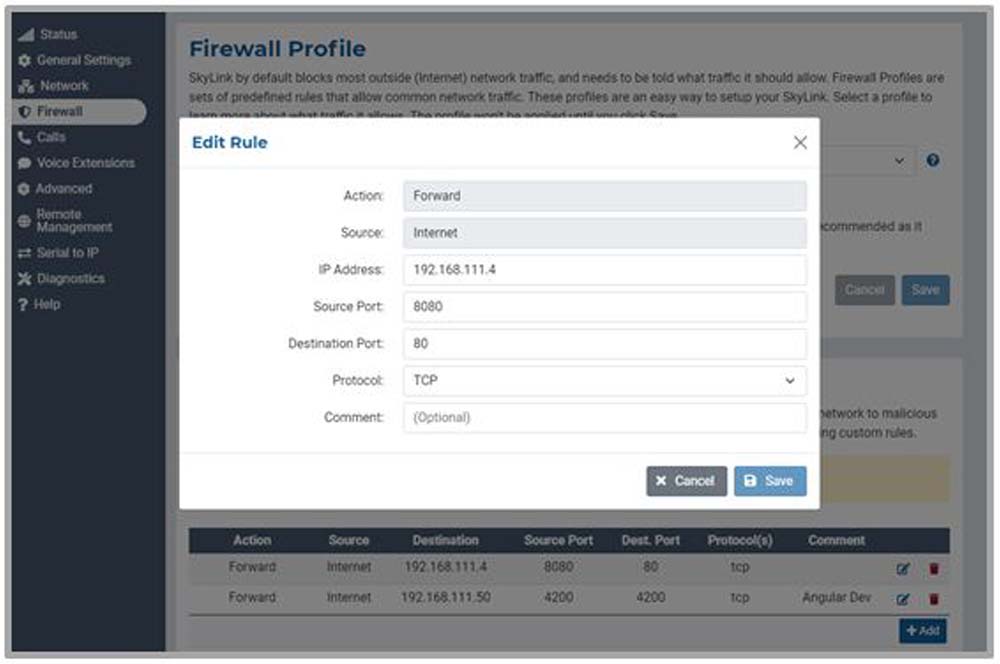
Fill out the open fields and press ‘Save.’ The new rule will then appear in the table under the Advanced Rules section. Select the red trashcan icon to delete a rule.
Quick Tip: We recommend contacting our support team for assistance with custom rule creation.
Viewing Profiles #
Previously, we showed you how to create and assign device & voice profiles. After these profiles have been applied and units are active in the field, you can see a comparison between a device’s current configuration and the profile configurations assigned to the device through the portal.
To see these differences:
- Navigate to the Devices screen in the SkyLink Cloud Services portal.
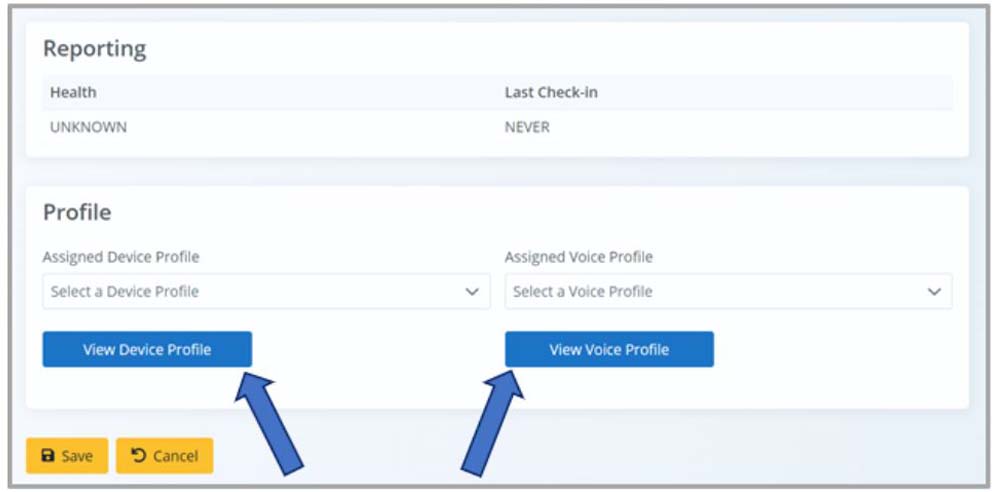
- Select the device that you would like to view. You will then be directed to the Edit Device screen.
- At the bottom of the screen, choose either the ‘View Device Profile’ or ‘View Voice Profile’ button.
The text in each field shows current device configurations. You may see two font colors under each field:
- BLACK – This means the configs currently on the device match the profile changes attempting to be pushed by the portal.
- RED – This means the configs currently on the device are different than the assigned profile configs.
Select the Network or Firewall tabs to view any differences among those profiles.


