RedPort HALO WiFi Extender Quick Start Guide #
[/vc_column_text][vc_separator el_width=”30″][vc_column_text]The RedPort HALO WiFi Extender Quick Start Guide will help you get up and going with your equipment, effectively bringing you a stronger signal.
[/vc_column_text][/vc_column][/vc_row][/vc_section][vc_section][vc_row][vc_column width=”1/2″][vc_single_image image=”14349″ img_size=”full” alignment=”center”][/vc_column][vc_column width=”1/2″][vc_single_image image=”14356″ img_size=”full” alignment=”center”][/vc_column][/vc_row][/vc_section][vc_section][vc_row][vc_column][vc_separator style=”dashed”][/vc_column][/vc_row][/vc_section][vc_section][vc_row][vc_column width=”1/2″][vc_single_image image=”14351″ img_size=”full” alignment=”center”][/vc_column][vc_column width=”1/2″][vc_single_image image=”14354″ img_size=”full” alignment=”center”][/vc_column][/vc_row][/vc_section][vc_section][vc_row][vc_column][vc_separator style=”dashed”][/vc_column][/vc_row][vc_row][vc_column width=”1/2″][vc_single_image image=”14359″ img_size=”full” alignment=”center”][/vc_column][vc_column width=”1/2″][vc_single_image image=”14363″ img_size=”full” alignment=”center”][/vc_column][/vc_row][/vc_section][vc_section][vc_row][vc_column][vc_separator style=”dashed”][/vc_column][/vc_row][vc_row][vc_column width=”1/2″][vc_single_image image=”14365″ img_size=”full” alignment=”center”][/vc_column][vc_column width=”1/2″][vc_single_image image=”14367″ img_size=”full” alignment=”center”][/vc_column][/vc_row][/vc_section][vc_row][vc_column][vc_separator][/vc_column][/vc_row][vc_row][vc_column][vc_single_image image=”14393″ img_size=”full” alignment=”center” onclick=”custom_link” img_link_target=”_blank” link=”https://apollosatellite.com/products/redport-halo-wi-fi-extender-system”][/vc_column][/vc_row][vc_row][vc_column][vc_separator][/vc_column][/vc_row][vc_section][vc_row][vc_column width=”1/2″][vc_column_text]Configuring the Optimizer to Use the WiFi Extender #
Step 1
WiFi connect to the Optimizer
Step 2
Use a browser to go to this URL: 192.168.10.1
Step 3
Login with the following info:
Username: admin
Password: webxaccess
The WiFi Extended Setup section of the Optimizer home page should be visible. (This section only appears if the Extender is plugged into the LAN port of the Optimizer and the Extender is powered on. If either of those conditions are not met, then this section will not be visible in the Optimizer interface).

Step 4
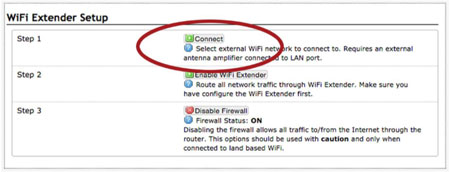
Connect to the external wifi network by clicking on the <Connect> button.
Step 5
You are now in the “Wireless Overview” tab. You need to scan for available WiFi networks in order to connect.
Hit <Scan>

Select the WiFi network you want to connect to and press <Join Network>
Step 6
Enter in the password for the WiFi network (if required)
Step 7
Select <Save & Apply> to confirm that you want to connect to that WiFi network. Until you are connected, the signal strength will say 0%.
Click on the Home tab to go back to the Home screen.[/vc_column_text][/vc_column][vc_column width=”1/2″][vc_column_text]
Routing Network Traffic #
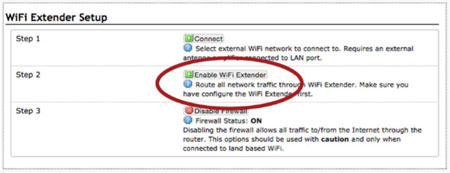
Because the Optimizer can be used to connect to a number of different networks (like satellite, for example) you need to tell it to route traffic through the WiFi Extender.
On the Wireless Overview page select:
<Enable Extender>

(You may be asked to re-enter your username and password. Reference these under Step 2.)
All traffic is now routed through the WiFi Extender.
If you want to stop using the WiFi Extender (Say, if you want to route traffic through your satellite device again), simply select <Disable WiFi Extender>.[/vc_column_text][vc_column_text]
Managing the Firewall #
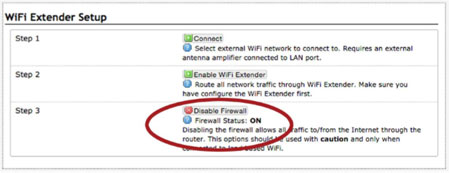
By default, the firewall is enabled. This means that all traffic from your computer or mobile device is blocked from the Internet except for RedPort compression software.
(Optimizer-compatible compression services include XGate and XWeb, OCENS Mail, Satphone.me, and many more. See redportglobal.com for a full list of compatible compression data services).
This setting is recommended when using the WiFi Extender in an area where there may be many users competing for the WiFi network bandwidth thereby causing slow and painful Internet connections.

If you want full access to the Internet (for example, for syncing a program or accessing services or apps that are being clocked (ie: streaming video), you must disable the firewall.
To disable the firewall, hit <Disable Firewall>
To disconnect from the WiFi Extender, select <Disable WiFi Extender>
Once disabled, the Firewall will turn back on automatically. If the Optimizer is powered on and off, the Firewall will come back on automatically.[/vc_column_text][/vc_column][/vc_row][/vc_section][vc_section][vc_row][vc_column][vc_separator][/vc_column][/vc_row][vc_row][vc_column][vc_column_text]
Troubleshooting #
If you are unable to establish a connection to the long distance WiFi, please contact Apollo SatCom here: Apollo SatCom Contact. To expedite the process, if you would like you can include the answers to the queries below:
1. Are there lights on for both Optimizer and the WiFi Extender?
2. Is the Ethernet cable from the WiFi Extender plugged into the LAN port of the Optimizer?
3. When you access the Optimizer interface, do you see a section called “WiFi Extender Setup?”
4. When you look at the available networks, please tell us how much signal strength Optimizer has (should be identified as wxa-XXXX).
Please note that you are using the RedPort Halo WiFi Extender system and submit your answers to Apollo SatCom; we will be happy to help![/vc_column_text][/vc_column][/vc_row][/vc_section]


