Globalstar SPOT X Quick Start Guide #
[/vc_column_text][vc_separator el_width=”30″][vc_column_text]The Globalstar SPOT X Quick Start Guide assists you in getting your device up and connected so you can communicate outside of cellular networks
[/vc_column_text][/vc_column][/vc_row][/vc_section][vc_section][vc_row][vc_column width=”1/2″][vc_column_text]Activating Your SPOT X #
Important: Your SPOT X requires an active SPOT service plan subscription to communicate. The SPOT X features, up to and including S.O.S., will not work without first activating your device. If you encounter any issues feel free to contact Apollo SatCom for any assistance: Apollo SatCom Contact.[/vc_column_text][vc_column_text]
Charging Your SPOT X #
Connect the Micro USB Data/Power Cable to the SPOT X USB Data/Power Port and connect to either a computer or the AC Power Adapter. The battery with the lightning bolt icon will be visible while charging.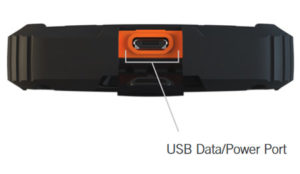
Once the battery icon indicates a full charge ![]() , disconnect the Power Cable from the SPOT X. Make sure the USB cover is firmly sealed to ensure the device’s waterproof capability.[/vc_column_text][vc_column_text]Electronic Serial Number (ESN), Authorization Code and Mobile Device Number (MDN)
, disconnect the Power Cable from the SPOT X. Make sure the USB cover is firmly sealed to ensure the device’s waterproof capability.[/vc_column_text][vc_column_text]Electronic Serial Number (ESN), Authorization Code and Mobile Device Number (MDN)
The ESN and Authorization Code can be found on the SPOT X device by selecting System Settings ![]() and scrolling to and selecting SPOT X Info. The ESN can also be found on the bottom of your SPOT X retail box. You will need both codes when setting up your SPOT MY ACCOUNT. Your MDN will be assigned after you complete the SPOT MY ACCOUNT activation process. Share this number with others so they can message you directly!
and scrolling to and selecting SPOT X Info. The ESN can also be found on the bottom of your SPOT X retail box. You will need both codes when setting up your SPOT MY ACCOUNT. Your MDN will be assigned after you complete the SPOT MY ACCOUNT activation process. Share this number with others so they can message you directly!
Activation Your SPOT X and Selecting a Service Plan
1. Go to FindMeSPOT.com/Activate
2. New SPOT customers should select Begin Activation to create a new SPOT account. Existing SPOT customers should login to their current SPOT account and select Add New SPOT Device.
3. Follow the onscreen instructions to create an account, choose a service plan, and additional services for your SPOT X. Confirm your order to finish the SPOT MY ACCOUNT activation process.[/vc_column_text][vc_column_text]IMPORTANT – SPOT X Firmware Update Required
Once you complete the SPOT My Account Activation, make sure your device is updated with the latest firmware. Syncing SPOT X with your SPOT My Account will be required for several features such as contacts and predefined messages to appear on your device.
Visit Apollo’s Current Firmware to download the latest SPOT X firmware updater.[/vc_column_text][vc_column_text]Configuring Your SPOT X
1. Power on the SPOT X by quick pressing the Power button.
2. You can start the configuration process by selecting your desired language, time and date setting, and follow all onscreen instructions[/vc_column_text][vc_column_text]
Status Lights/Features #
| Blinking Green | Blinking Red | No LED |
| Power LED |
SPOT X is powered on and battery life is over 20%
|
SPOT X is powered on and battery life is below 20%
|
SPOT X has either entered Power Saving Mode due to no button press or the unit is powered off
|
| Power Button |
Press the power button to power on the SPOT X. Long press the power button for 3 seconds to power off.
|
While the SPOT X is powered ON, quick press the Power button to toggle the screen and keyboard backlight on and off.
|
| S.O.S. Button |
Long press the S.O.S. button for 3 seconds or until the S.O.S. screen is displayed to initiate an S.O.S. with GEOS IERCC.
|
While S.O.S is active, long press the S.O.S. button for 3 seconds to cancel the S.O.S. with GEOS IERCC.
|
| Tracking Button |
Long press the Track button for 3 seconds to initiate tracking mode at your set interval rate.
|
While Tracking Mode is active, long press the Track button for 3 seconds to cancel Tracking.
|
| Directional Pad |
Press up, down, left, and right to navigate to and highlight a section on the screen.
|
Press the center button to make a selection.
|
| Back Button |
Quick press the Back button to navigate to the previous screen.
|
Press and hold the Back button to go back to the Main Menu screen.
|
| Qwerty Keypad |
Use the keyboard to create messages, contact names, and other manual entries as required.
|
| Display Screen |
The SPOT X Display screen allows for interaction with the Main Menu, sub-menus, and other onscreen features.
|
| USB Power/Data Port |
Used to connect a Micro USB Cable to the SPOT X USB Port to charge the POWER X device and to sync with your SPOT My Account.
|
SPOT X At a Glance #
[/vc_column_text][vc_single_image image=”14128″ img_size=”full” alignment=”center”][vc_separator][vc_column_text]Status Bar Icons #
Battery
![]() Battery Strength
Battery Strength
![]() Low Battery
Low Battery
![]() Battery Charging[/vc_column_text][vc_column_text]
Battery Charging[/vc_column_text][vc_column_text]
GPS Signal
![]() GPS Signal Available
GPS Signal Available
![]() GPS Signal Unavailable[/vc_column_text][vc_column_text]
GPS Signal Unavailable[/vc_column_text][vc_column_text]
Device Required
![]() Sync Required[/vc_column_text][vc_column_text]Modes
Sync Required[/vc_column_text][vc_column_text]Modes
![]() S.O.S. Active
S.O.S. Active
![]() Social
Social
![]() Tracking Active
Tracking Active
![]() Suspended Tracking[/vc_column_text][vc_column_text]Time
Suspended Tracking[/vc_column_text][vc_column_text]Time
![]() 12 Hour Format
12 Hour Format
![]() 24 Hour Format[/vc_column_text][/vc_column][vc_column width=”1/4″][vc_column_text css=”.vc_custom_1534550599347{margin-top: 38% !important;margin-right: 20% !important;}”]Device Overview
24 Hour Format[/vc_column_text][/vc_column][vc_column width=”1/4″][vc_column_text css=”.vc_custom_1534550599347{margin-top: 38% !important;margin-right: 20% !important;}”]Device Overview
- Power/Backlight
- Power LED
- Display Screen
- S.O.S. Button
- Directional Pad
- Track Button
- Back Button
- QWERTY Keyboard
- USB Power/Data Port
- Opens Messages Screen
- Sends Check In Message
- Posts to Social
- Fetches New Messages
- Opens Tracking Screen
- Opens Navigation Screen
- Opens System Settings
- Initiates S.O.S. with GEOS IERCC
Menu Display Icons #
Messages
![]() Create New Messages
Create New Messages
![]() Send Message
Send Message
![]() Reply to Message
Reply to Message
![]() Predefined Messages[/vc_column_text][vc_column_text]
Predefined Messages[/vc_column_text][vc_column_text]
Contacts
![]() Contact List
Contact List
![]() Create New Contact[/vc_column_text][vc_column_text]GPS
Create New Contact[/vc_column_text][vc_column_text]GPS
![]() Include Elevation with Messages
Include Elevation with Messages
![]() Include GPS Coordinates with Message
Include GPS Coordinates with Message
![]() Create New Waypoint
Create New Waypoint
![]() Navigate to Location[/vc_column_text][vc_column_text]
Navigate to Location[/vc_column_text][vc_column_text]
Other
![]() Delete
Delete
![]() Save
Save
![]() Back[/vc_column_text][vc_column_text]Contacts
Back[/vc_column_text][vc_column_text]Contacts
![]() Email Contact
Email Contact
![]() Mobile Contact
Mobile Contact
![]() Group Contact
Group Contact
![]() Facebook
Facebook
![]() Twitter[/vc_column_text][vc_column_text]
Twitter[/vc_column_text][vc_column_text]
Sent Message Status
![]() Message Sent
Message Sent
![]() Message Failed
Message Failed
![]() Message Sent to Queue
Message Sent to Queue
![]() Message Sent – Delivery Unconfirmed[/vc_column_text][/vc_column][/vc_row][/vc_section][vc_section][vc_row content_placement=”middle”][vc_column][vc_single_image image=”14262″ img_size=”full” alignment=”center” css=”.vc_custom_1534972555179{padding-right: -10% !important;padding-left: -10% !important;}”][vc_btn title=”Buy Now” shape=”square” color=”sky” size=”lg” align=”center” link=”url:https%3A%2F%2Fapollosatellite.com%2Fproducts%2Fglobalstar-spot-x-satellite-communicator|||” css=”.vc_custom_1534894132312{margin-top: -8% !important;}”][/vc_column][/vc_row][/vc_section][vc_section][vc_row][vc_column][vc_column_text css=”.vc_custom_1534891879617{margin-top: 5% !important;}”]
Message Sent – Delivery Unconfirmed[/vc_column_text][/vc_column][/vc_row][/vc_section][vc_section][vc_row content_placement=”middle”][vc_column][vc_single_image image=”14262″ img_size=”full” alignment=”center” css=”.vc_custom_1534972555179{padding-right: -10% !important;padding-left: -10% !important;}”][vc_btn title=”Buy Now” shape=”square” color=”sky” size=”lg” align=”center” link=”url:https%3A%2F%2Fapollosatellite.com%2Fproducts%2Fglobalstar-spot-x-satellite-communicator|||” css=”.vc_custom_1534894132312{margin-top: -8% !important;}”][/vc_column][/vc_row][/vc_section][vc_section][vc_row][vc_column][vc_column_text css=”.vc_custom_1534891879617{margin-top: 5% !important;}”]
Getting Started #
[/vc_column_text][/vc_column][/vc_row][vc_row][vc_column width=”1/2″][vc_column_text]Important SPOT X Tips #
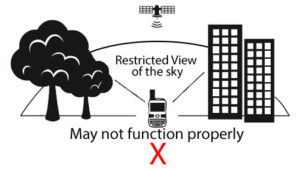
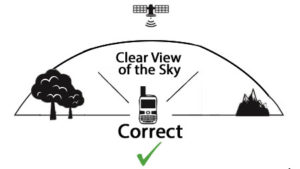
- SPOT X needs a clear view of the sky with no obstructions (buildings, roof overhangs, trees, etc.) to obtain a GPS signal in order to provide the most accurate location information and send messages (Figure 1). SPOT X may not function properly at the bottom of a deep canyon, in a cave, or in very dense woods.
Figure 1
- Orienting SPOT X vertically with the antenna facing towards the sky, will improve performance as the antenna is located on the top portion of the device.
- Before heading off the grid, we strongly recommend that you send a test message to ensure your device was activated properly. You can view your sent messages in your account at FindMeSPOT.com/MyAccount.
Contacts
#
The Globalstar SPOT X can hold up to 70 contacts and/or contact groups. Contacts can be manually added through the SPOT X or through SPOT MY ACCOUNT. If added through SPOT MY ACCOUNT, syncing is required using the SPOT X Firmware Updater.
Manually Adding a Contact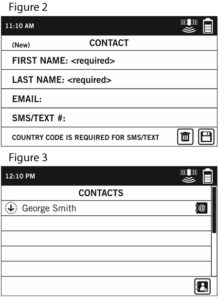
1. On the Main Menu screen, select ![]() to display the Messages screen, then select Contacts.
to display the Messages screen, then select Contacts.
2. On the Contacts screen, select ![]() to display the New Contact screen (Figure 2).
to display the New Contact screen (Figure 2).
3. Enter the required information and select ![]() to save the contact to your SPOT X device.
to save the contact to your SPOT X device.
If both Email and SMS/TEXT fields are filled in, the SPOT X will create two separate contacts, one for each field.
4. Additionally, the sync required icon ![]() (Figure 3) will appear next to the new contact’s name and in the Status Bar. This indicates that the SPOT X will need to sync with SPOT MY ACCOUNT, if you would like the contact to be uploaded to your contact list in SPOT MY ACCOUNT.
(Figure 3) will appear next to the new contact’s name and in the Status Bar. This indicates that the SPOT X will need to sync with SPOT MY ACCOUNT, if you would like the contact to be uploaded to your contact list in SPOT MY ACCOUNT.
NOTE: See the User Guide for instructions on how to add contacts through SPOT MY ACCOUNT[/vc_column_text][vc_column_text]SPOT X Operating Temperatures
Prolonged use or storage of your SPOT X in direct sunlight or in a vehicle may cause the device to overheat and/or damage its battery. SPOT X can withstand operating in temperatures of -4F to +140F (-20C to +60C).[/vc_column_text][vc_column_text]
Social Media #
Link your Facebook and Twitter accounts to your SPOT X directly from your SPOT My Account. Once you’ve linked your accounts you will be able to send 140 character updates to those accounts from your SPOT X at any time. Syncing SPOT X with your SPOT account is required for social media to appear as a contact on your device.
Simply create a new message, select ![]() to access your contact list, and choose Facebook
to access your contact list, and choose Facebook ![]() and/or Twitter
and/or Twitter ![]() as a contact.[/vc_column_text][vc_column_text]
as a contact.[/vc_column_text][vc_column_text]
Tracking #
With SPOT X, your friends and family can track your progress in near real-time using SPOT Share Page with Google Maps™, giving them a virtual breadcrumb trail of your adventure.
Selecting the Tracking Interval
The SPOT X default tracking interval is 10 minutes. Depending upon your service plan, you can select from tracking intervals of 2½, 5, 10, 30, or 60 minutes.
On the Main Menu, select ![]() , then scroll to and select Tracking Interval and choose from the list of available intervals. All non-subscribed tracking intervals will be grayed out.
, then scroll to and select Tracking Interval and choose from the list of available intervals. All non-subscribed tracking intervals will be grayed out.
Initiating Tracking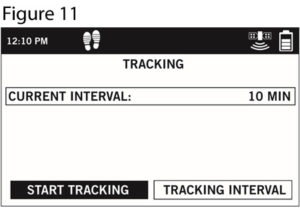
1. Power on the SPOT X and long press the Track button ![]() on the SPOT X device for 3 seconds or until the tracking icon
on the SPOT X device for 3 seconds or until the tracking icon ![]() appears in the Status Bar. Or from the Main Menu screen, select
appears in the Status Bar. Or from the Main Menu screen, select ![]() followed by Start Tracking (Figure 11).
followed by Start Tracking (Figure 11).
2. Once your GPS position is acquired, SPOT X will send your tracks in accordance with the tracking interval you have selected until you manually stop tracking, the SPOT X detects no movement, or you power off the SPOT X device.
3. While Tracking is active, SPOT X should remain outside in clear view of the sky with no obstructions in order to maintain network connectivity.
Cancelling Tracking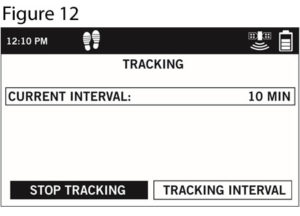
Long press the Track button ![]() on the device for 3 seconds and follow the onscreen instructions. You can also cancel Tracking by selecting Stop Tracking from the Tracking screen and follow the onscreen instructions (Figure 12).[/vc_column_text][/vc_column][vc_column width=”1/2″][vc_column_text]
on the device for 3 seconds and follow the onscreen instructions. You can also cancel Tracking by selecting Stop Tracking from the Tracking screen and follow the onscreen instructions (Figure 12).[/vc_column_text][/vc_column][vc_column width=”1/2″][vc_column_text]
2-Way Messaging #
Create and Send a Message
1. On the Main Menu screen, select ![]() to display the Messages screen, and then select Inbox.
to display the Messages screen, and then select Inbox.
2. On the Messages screen, select ![]() to compose a new message.
to compose a new message.
3. Select ![]() to add contacts.
to add contacts.
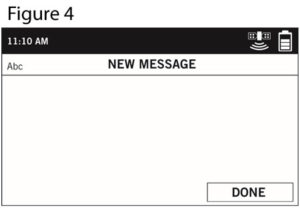
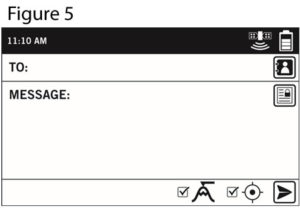
4. Once you have selected a contact, select the Message field to display the New Message screen (Figure 4). Enter a message of up to 140 characters and select Done. NOTE: You can include your Elevation and/or GPS Coordinates by clicking on the box next to the ![]() and
and ![]() icons (Figure 5).
icons (Figure 5).
5. Select ![]() to send your message
to send your message
Predefined Messages
Make messaging even easier by sending a Predefined Message. These messages can only be created in your SPOT MY ACCOUNT and up to 14 Predefined Messages can be stored on your SPOT X. Syncing SPOT X with your SPOT MY ACCOUNT is required for Predefined Messages to appear on your device.
To send a Predefined Message, simply create a new message and select the Predefined Messages button ![]() to access the Predefined Messages you have created.
to access the Predefined Messages you have created.
Check In
Check In with friends and family by quickly sending a predefined message and/or email along with your GPS coordinates. The Check In message will include a link to Google Maps containing the SPOT X’s location. The Check In messages can be created and assigned to contacts via SPOT MY ACCOUNT at any time.
Sending a Check In Message
On the Main Menu screen, simply select ![]() and the pre-programmed message will be sent to your pre-assigned contacts.[/vc_column_text][vc_column_text]
and the pre-programmed message will be sent to your pre-assigned contacts.[/vc_column_text][vc_column_text]
Navigation #
Calibrating the Compass
Your SPOT X uses a digital compass to give accurate heading and bearing information. The SPOT X automatically checks compass calibration and will instruct you to calibrate when necessary.
1. On the Main Menu, select ![]() , then select Settings and scroll to and select the Calibrate Compass button.
, then select Settings and scroll to and select the Calibrate Compass button.
2. The Calibrate Compass screen will be displayed. Select Start Calibration to begin and follow the onscreen instructions.[/vc_column_text][vc_column_text]
S.O.S. #
Important Notice: S.O.S. Mode Should Only Be Used During Life Threatening Emergencies. Sending False S.O.S. Messages May Subject You To Liability For Additional Charges.
Activate the S.O.S. mode to begin communicating and sending alerts directly to GEOS International Emergency Response Coordination Center (IERCC). GEOS IERCC will notify the appropriate emergency responders based on the SPOT X’s GPS location and your emergency situation. Responders may include local police, Coast Guard, or Search and Rescue teams. For full details about GEOS IERCC, please visit FindMeSPOT.com/GEOS.
Initiating S.O.S.
1. Power on device, lift cover, long press the S.O.S. button for 3 seconds or until S.O.S. screen is displayed, or select S.O.S. from the Main Menu screen and follow the onscreen instructions.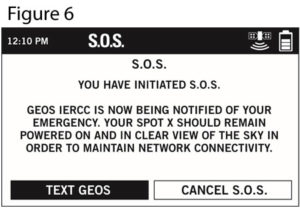
2. The S.O.S. icon should appear on the Status Bar to indicate that S.O.S. has been initiated (Figure 6).
3. Once S.O.S. is initiated, GEOS IERCC will be notified of your emergency. SPOT will continuously send S.O.S. notifications with your GPS position to GEOS IERCC every 5 minutes until S.O.S. is cancelled or the SPOT X is powered off.
4. SPOT will then allow you to communicate 2-Way, via message, with GEOS IERCC by selecting the Text GEOS button
5. Upon activating S.O.S., the device will terminate all previously queued messages waiting to be transmitted as well as Navigation, Check In, Social, and Tracking if active. The SPOT X device will be locked down on S.O.S. Mode and you will not be able to send messages to anyone other than GEOS IERCC until S.O.S. is cancelled.
6. While S.O.S. is active, the SPOT X should remain outside in clear view of the sky with no obstructions in order to maintain network connectivity.
Cancelling S.O.S.
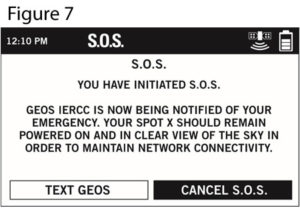
Lift cover, long press the S.O.S. button for 3 seconds and follow the onscreen instructions, or select Cancel S.O.S. from the S.O.S. screen. (Figure 7).
 [/vc_column_text][/vc_column][/vc_row][vc_row][vc_column][vc_separator css=”.vc_custom_1535247492465{margin-top: 5% !important;}”][/vc_column][/vc_row][vc_row][vc_column][vc_column_text]
What’s in the Box? #
[/vc_column_text][/vc_column][/vc_row][/vc_section][vc_section][vc_row][vc_column width=”1/4″][/vc_column][vc_column width=”1/4″][vc_column_text css=”.vc_custom_1534818045412{margin-left: 15% !important;}”]- SPOT X Device
- Strap and Carabiner
- 18” Micro USB Data/Power Cable
- SPOT X Quick Start Guide
- S.O.S. Mirrored Sticker
- Warranty Card
- GEOS Reference Guide
- AC Power Adapter


