Table of Contents
- iSavi Satellite Hub Quick Start Guide
- Quick Reference
- Step One: Getting Started
- Step Two: Attach the Battery
- Step Three: Charging Your Device
- Step Four: Power On and Connect
- Point the Terminal and Connect to the Network
- Method One: LED Visual Pointing Mode
- Step One
- Step Two
- Step Three
- Step Four
- Magnetic Interference
- Step One
- Step Two
- Method Two: Audio Assisted Pointing Mode
- Step One
- Step Two
- Step Three
- Step Four
- Step Five
- Method Three: IsatHub Control App
- Step One
- Step Two
- Step Three
- Accessing Data and Calls
- Step One
- Step Two
- Step Three
- Step Four
- Step Five
- Powering Down and Detaching the Battery
- Step One
- Step Two
- Step Three
- Step Four
[vc_row 0=””][vc_column][vc_column_text 0=””]
iSavi Satellite Hub
Step One:
Step Two:
Step Three:
Step Four:
Point the Terminal and
Method One: LED
Method Two: Audio
Method Three:
Accessing Data
Powering Down and
iSavi Satellite Hub
Quick Start Guide #
Wideye iSavi Satellite Hub @ Apollo Satellite Communications
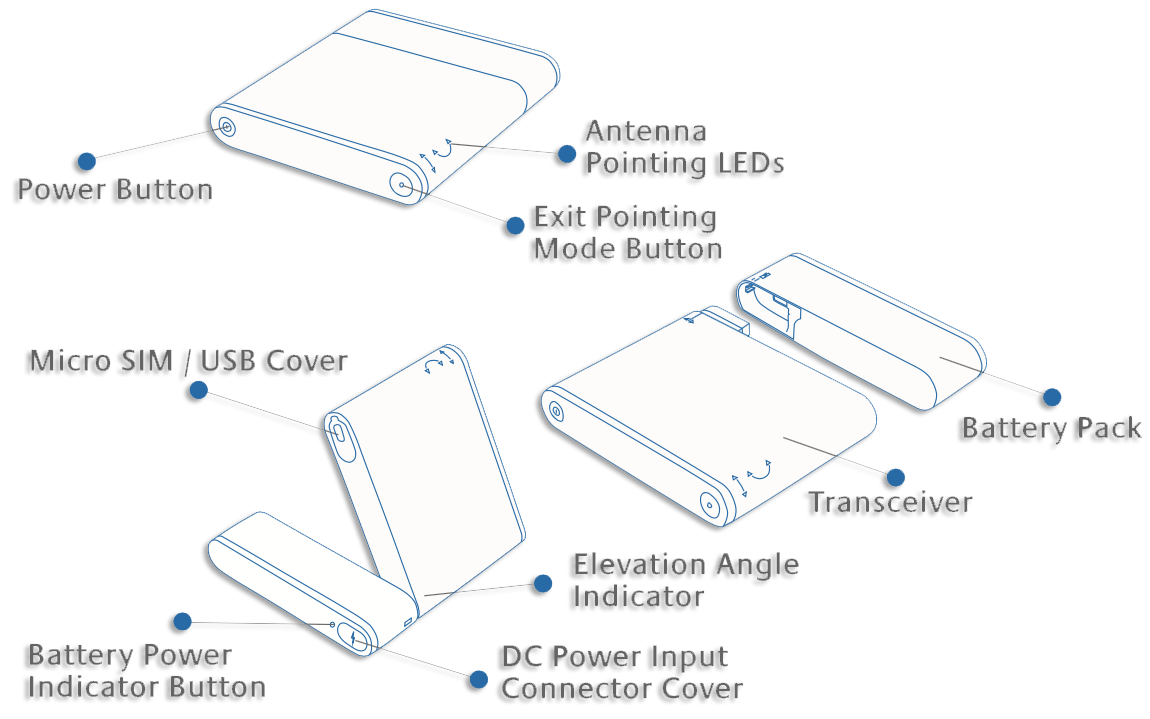
Quick Reference #
Step One:
Getting Started #

- Insert the Micro-SIM card in your iSavi Satellite Hub with its gold contact facing down Important Note: Ensure your iSavi is off before removing or installing the SIM card
Step Two:
Attach the Battery #

- Attach the battery gently to your iSavi Satellite Hub in the direction as shown until a click is heard
Step Three:
Charging Your Device #
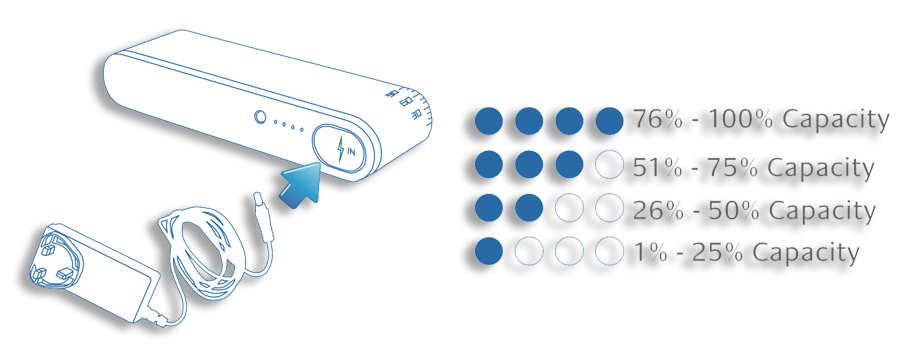
- Insert charger lead and then plug the adapter into a power source
- Your iSavi should be charged 8 hours before first use
- Charging will cease automatically once the battery is fully charged
- You can check the battery level by pressing the “Battery Power Indicator Button”
Step Four:
Power On and Connect #

- After charging, place your iSavi outside in a position with an unobstructed view of the sky
- Press and hold the power button for 5 seconds to switch on your iSavi – Leave it for a minimum of 1 min
- Your iSavi must acquire a Global Positioning System (GPS) fix before you can connect to the network for the first time
- Important Note: The GPS location information is required for the iSavi to assist you in pointing it correctly to the satellite
Point the Terminal and
Connect to the Network #
Method One: LED
Visual Pointing Mode #
Step One #
- Make sure you place your iSavi in the open air with an unobstructed view of the sky – your iSavi needs to be pointed towards the satellite in the correct direction to ensure connection to the satellite network
- Important Note: In some cases, you might encounter magnetic interference, this issue is explained in further detail below in the section named “Magnetic Interference”
Step Two #
- Tilt your iSavi up or down in the direction of the flashing green light until both “up” and “down” LED’s are solid green
Step Three #
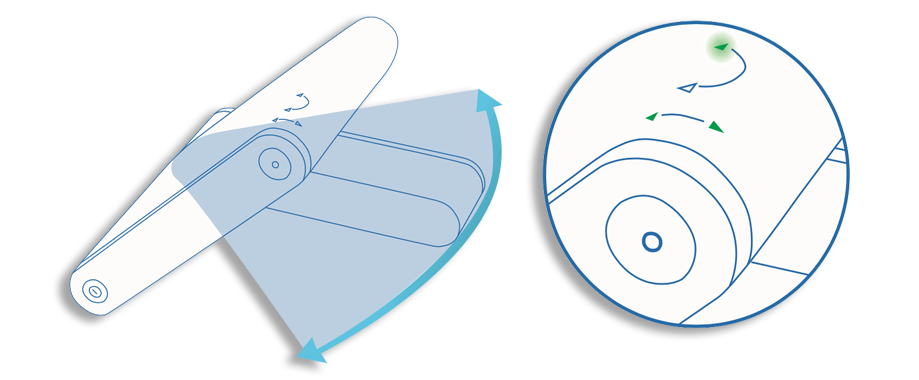
- Turn your iSavi left or right in the direction of the flashing green light until both “left” and “right” LED’s are solid green
Step Four #
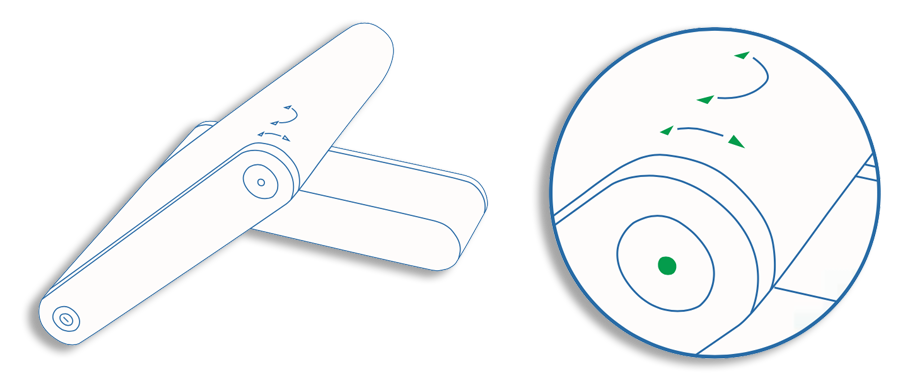
- When all four tilt and turn LED’s are solid green, press the flashing “Exit Pointing Mode” button – your iSavi will now connect to the network
Magnetic Interference #
Occasionally, if your iSavi is in close proximity to ferrous objects. the sensors will have difficulty determining its correct orientation.
When this happens, the LED’s will flash in the following sequence while the magnetic interference message will appear on your IsatHub Control app:

The following steps should
resolve this issue:
Step One #
- Move your iSavi to a new location – ensure your terminal is situated away from other electronic devices, metal objects and appliances the generate RF noise
Step Two #
- Press the “Exit Pointing Mode” button once to exit from this state and repeat the steps of the LED Visual Pointing Mode procedure – the above LED’s status will appear again if the new location is still having magnetic interference – repeat step 2 until the LED’s status indicates the LED Visual Pointing Mode
- If this doesn’t solve the issue, please try the Method Two: Audio Assisted Pointing Mode explained below.
Method Two: Audio
Assisted Pointing Mode #
Step One #
- To switch into audio assisted pointing mode, press and hold the “Exit Pointing Mode” button for 5 seconds when you iSavi is in LED visual pointing mode

- All 4 LED’s will be flashing green when the audio assisted pointing mode is activated
- The beeping sound indicates the signal strength – the frequency of the beeping will become nighter when the signal is stronger
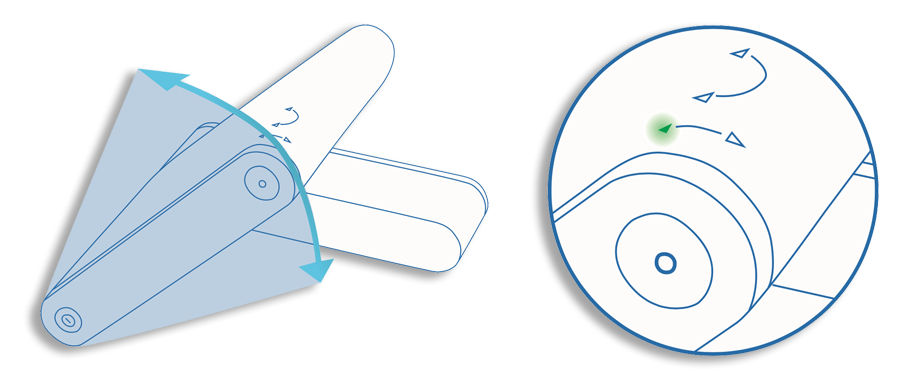
Step Two #

- Tilt the terminal up to 45 degrees from laying horizontal
Step Three #

- Turn the terminal slowly clockwise or counterclockwise until the beeping frequency is maximized
Step Four #
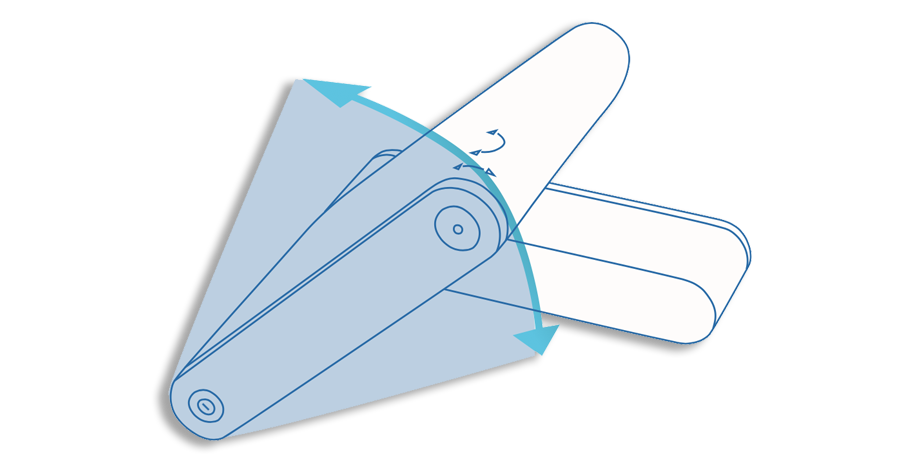
- Tilt the terminal up or down slowly until the beeping frequency is maximized – fine tune the position until no further increase of the beeping frequency is heard – “Exit Pointing Mode” button will turn to flashing green when the signal strength is satisfactory for network registration
Step Five #

- Press the “Exit Pointing Mode” button to exit antenna pointing mode and start network registration
Method Three:
IsatHub Control App #
Step One #
- Download the IsatHub Control app from the iOS App Store or Google Play on your smart device(s)
- Important Note: Data downloaded over the iSavi is chargeable, so use a free data service to acquire these apps whenever possible
Step Two #
- Connect to your iSavi over the Wi-Fi by selecting it from the list of available Wi-Fi network – the default Wi-Fi network name (SSID) and password can be obtained from the product label on the rear of your iSavi or the label on the packaging box
Step Three #
- Follow the on screen instructions and press “Pointing assist” for specific help
Accessing Data
and Calls #
Step One #
- Connect to your iSavi over the Wi-Fi by selecting it from the list of available Wi-Fi networks – the default Wi-Fi network name (SSID) and password can be obtained from the product label on the rear of your iSavi
Step Two #
- For smart device control of your iSavi, open the IsatHub Control app and follow the instructions presented to get started – refer to the “Pointing Assist” functionality in the IsatHub Control app
- For control of your iSavi using your web browser, access the web console by opening any web browser and type https://iSavi or https://192.168.1.35 into the address bar
Step Three #
- To access your chosen control interface, the default credentials are:
Username: admin
Password: 1234
Step Four #
- Once your iSavi is connected to the network, you are ready to start making calls or sending text messages on any iOS or Android smart device with the IsatHub Voice app
- The IsatHub Voice app is available from the iOS App Store and Google Play – it is advised to install the application using a free data service before connecting to the iSavi satellite terminal
Step Five #
- Once your iSavi is connected to the network you are ready to start a data session – Press “Connect Data” button to begin and “Disconnect Data” to end all connection to the Internet
- The web console provides data access through the “Activate Data Connection” button on the Home page when using a web browser
Powering Down and
Detaching the Battery #
Step One #

- Press and hold the power button for 5 seconds to switch of your iSavi
Step Two #
- The powering down process takes about 20 seconds – wait until all the LED’s are off
Step Three #
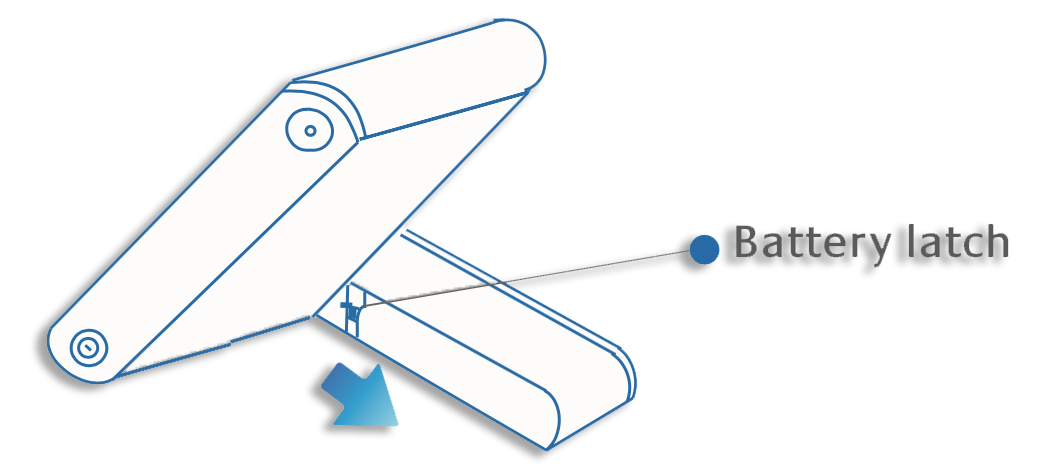
- Pull down the battery latch in the direction as shown
Step Four #

- Remove the battery pack gently as shown
- Important Note: Ensure your iSavi is off before removing the battery pack – the battery pack can be charged separately without being attached to your iSavi as well


