Inmarsat iSavi Satellite Hub FAQ #
[/vc_column_text][vc_separator el_width=”30″][vc_column_text css=”.vc_custom_1537908038236{margin-right: 20% !important;margin-left: 20% !important;}”]If you are having issues with your iSavi Satellite Hub then you are in the right spot – these are just some simple queries that customers have when they are getting started with their satellite hub or even satellite communications in general. Feel free to contact Apollo SatCom for any questions: Apollo SatCom Contact
[/vc_column_text][/vc_column][/vc_row][/vc_section][vc_section][vc_row][vc_column][vc_column_text]My iSavi will not turn on successfully.Check if the battery is attached correctly. Press and hold the Power Button for 5 seconds.
Check battery level. If battery level is low the battery should be charged for at least 20 minutes to have sufficient power to switch on the terminal.
How do I turn off my iSavi?
Press and hold the Power Button for 5 seconds.
Note: Do not remove the battery when powering down is in progress, otherwise the terminal logs may not be saved correctly.
Where can I check the default SSID and password of the WiFi connection?
The information is available on the product label, below the serial number.
LED Status indicates SIM card is not detected.
Power button LED is red. Ensure that a correct SIM card is inserted before turning on your iSavi. Your iSavi terminal is only compatible with an Inmarsat IsatHub SIM card. Connect to Web Console to check for the error statements (for example – SIM card not inserted, SIM PIN entry is required, terminal PIN entry is required, etc.) Feel free to contact Apollo SatCom with any issues, we are always happy to help: Apollo SatCom Contact
Where can I check the IMSI (SIM card number) of my iSavi?
In the Control app, navigate to Setting >> About. Alternatively, in the Web Console, navigate to Setting >> Terminal >> Info >> Information to check the details of the terminal (Serial Number, IMEI, IMSI number). It is highly recommended that you record your iSavi IMEI number and SIM card number when you first use the device.
My iSavi and/or SIM card has been lost or stolen?
Contact Apollo SatCom (or your current provider) as soon as possible so that your iSavi and/or SIM card can be barred.
Inmarsat iSavi Satellite Hub FAQ
I cannot connect to the WiFi?
Ensure that both the WiFi SSID and password are correct. Disable 3G or 4G service from your smart devices and try to connect to the WiFi again. The password is case-sensitive. If your password has uppercase or lowercase letters, they must be entered in the appropriate case.
Where should I place the terminal in order to start operation?
Ensure your iSavi is placed outside with a clear, unobstructed view of the sky. To acquire GPS, power on your iSavi and place the terminal flat on the ground, facing the sky. Leave it for approximately five minutes. Once the GPS coordinates have been acquired, your iSavi will automatically enter into the LED Visual Pointing Mode for optimal signal strength. The GPS fix status can now be found in the Web Console. Also, you can find information for iSavi LED status light codes here as well: Inmarsat iSavi LED Status Reference Guide
Magnetic interference detected.
Ensure that your iSavi is placed outside and away from electrical devices, metal objects, or appliances that generate RF noise; it also needs to be set up with an unobstructed view of the sky. Shift your iSavi to a new location, press the Exit Pointing Mode Button once to return back to LED Visual Pointing Mode and repeat the setup procedure. Alternatively, login to the Control app, follow the onscreen instructions and press ‘Pointing assist’ for specific help. Adjust until you get optimal signal strength and register to the network from the Control app.
Inmarsat iSavi Satellite Hub FAQ
How do I switch into Audio Assisted Pointing Mode?
By default, your iSavi is in LED Visual Pointing Mode. To switch to the Audio Assisted Pointing Mode, press and hold the Exit Pointing Mode Button for 5 seconds. Please note that your terminal will automatically revert to the default LED Visual Pointing Mode whenever you reboot your iSavi.
Azimuth and elevation are correct, but global beam (satellite signal) is not available?
Please ensure that there is no blockage in between your iSavi and the Inmarsat satellite. There must be a clear line of sight between your iSavi and satellite. Shift the location of your terminal until the Exit Pointing Mode LED shows flashing green, indicating that the global beam (satellite signal) has been detected.
Network Registration failure?
Try the network registration again by pressing and holding the Exit Pointing Mode Button for 3 seconds to repeat the LED Visual Pointing Mode procedure again for network registration. Feel free to contact Apollo SatCom at any time with any issues: Apollo SatCom Contact
GPS not available after timeout.
Power off your iSavi by pressing and holding the Power Button for 5 seconds. Ensure your iSavi is placed outside with a clear, unobstructed view of the sky. To acquire GPS, power on your iSavi and place the terminal flat on the ground and make sure that it is facing the sky. Leave it for approximately five minutes. Once the GPS coordinates have been acquired, your iSavi will automatically enter into LED Visual Pointing Mode for optimal signal strength. The GPS fix status can now be found in the Web Console. Also, you can find information for iSavi LED status light codes here as well: Inmarsat iSavi LED Status Reference Guide[/vc_column_text][/vc_column][/vc_row][/vc_section][vc_section][vc_row][vc_column][vc_single_image image=”14741″ img_size=”full” alignment=”center” onclick=”custom_link” link=”https://apollosatellite.com/products/wideye-isavi-global-bgan-satellite-hotspot”][/vc_column][/vc_row][/vc_section][vc_section][vc_row][vc_column][vc_column_text]iSavi terminal is registered to the network but failed in data activation.
Your iSavi needs a signal strength of at least 42dBHz to perform at an acceptable service level. Check the signal strength of your iSavi on the Control app or Web Console and if the signal strength is below 42dBHz, power down the terminal and repeat the setup procedure again. Take extra care to ensure you have sufficient credit to make a data connection. Check the APN settings on the Data Profile under Data via the Web Console. By default, the APN settings should be read from the SIM card, unless you have specified to use another APN instead of the one defined on the SIM card.
Inmarsat iSavi Satellite Hub FAQ
No Internet access even though data connection is activated.
Check firewall settings to ensure that it does not prevent the required Internet (IP) access.
All LEDs are off after the terminal registered to the network. How do I check the terminal status?
You can check the LED status by pressing the Exit Pointing Mode Button once. Please refer to our Inmarsat iSavi LED Status Reference Guide. Alternatively, you can check the status via the Web Console or Control app.
Web console could not receive a text message.
Maximum SMS storage is dependent on SIM card memory. If the memory is full, delete text messages to free up memory for new SMS texts. Text messages cannot be sent to and from some service providers who may not have an interconnect agreement with Inmarsat. Please try another network or use the Inmarsat website to send the SMS.
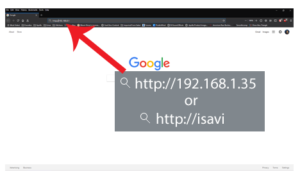
I am having a problem accessing the Web Console.
Please ensure that there is no problem with the WiFi connectivity. Make sure that the hostname is entered correctly – http://192.168.1.35 or http://iSavi (as shown below).
I cannot enter “Safe Mode”.
With the terminal powered off, first press and hold the Exit Pointing Mode Button followed by pressing and holding the Power Button. Release both Exit Pointing Mode button and Power button after 5 seconds simultaneously.
Firmware upgrading failure.
A firmware upgrade may be due to using an incorrect upgrade package file. Check that the correct firmware upgrade package has been selected. The latest firmware is available under Support >> Downloads and you can download the latest firmware from Apollo SatCom: Current Firmware. Failure can also be due to an interruption of the power supply during firmware upgrade. If the firmware upgrade is unsuccessful try repeating the procedure.
Problem with incoming/outgoing call.
Check that the Voice app status shows “Phone Ready”. If it shows “Registering…”, check your WiFi connection to ensure that your iSavi is connected to your smartphone or tablet. Check that the number format you dialed has included the full international prefix. Check your iSavi when the device used for VoIP calls is given the correct access rights for incoming/outgoing call functionality. If you have a prepaid subscription, check your prepaid balance to ensure you have sufficient credit to make a call.
Where do I download the Quick Start Guide?
You can actually get this straight from Apollo SatCom: Inmarsat iSavi Quick Start Guide Feel free to navigate to Support >> Downloads >> Manual to search and downloads the documents as well.
What should I do if I have forgotten the admin password?
Try the network registration again by pressing and holding the Exit Pointing Mode Button for 3 seconds to repeat the LED Visual Pointing Mode procedure again for network registration. Feel free to contact Apollo SatCom at any time with any issues: Apollo SatCom Contact
How do I send text messages using the Voice app?
You just need to login to the Control app before using the Voice app to send or receive SMS texts.
Control app or Web Console is disconnected during login session.
Control app or Web Console is the user interface for the configuration settings of your iSavi. As such, it is designed to allow only one control device to login to the Control app and another control device to login to the Web Console at the same time. When a first device is logged into the Control App or the Web Console, it will automatically be disconnected when you use a second device to login to the user interface. Note that except for the Control app and the Web Console which is limited to one control device to be connected at any one time, multiple devices can have simultaneous access to all other functionalities of your iSavi.[/vc_column_text][/vc_column][/vc_row][/vc_section]


