Globalstar Sat-Fi2 Quick Start Guide #
[/vc_column_text][vc_separator el_width=”30″][vc_column_text]The Globalstar Sat-Fi2 Quick Start Guide assists you in getting your device up and connected so you can communicate outside of cellular networks. If you would like your own copies to refer to while offline please feel free to download them below. We have also included a video for your perusal as well and if you have any questions whatsoever please contact Apollo SatCom anytime day or night.
Activation #
NOTE: For initial setup, a home/business Wi-Fi Internet connection will be required to complete Step 1 through Step 3 and email configuration.
PRODUCT REQUIRES ACTIVE SUBSCRIPTION: In order to begin using your Globalstar Sat-Fi2, please make sure you have an active subscription. If you do not have an active subscription or encounter issues with your device, please feel free to contact us: Apollo SatCom Contact Info.[/vc_column_text][vc_column_text]
Mobile Directory Number (MDN), and ICCID #
In order to activate your Sat-Fi2 and register your Globalstar My Account profile, you will need to have access to the ICCID number, which can be found on the bottom of your Sat-Fi2. Your MDN (telephone number) will be assigned to you during activation.
Step 1: Charge Your Sat-Fi2
Connect the Micro USB Data/Power Cable to the Sat-Fi2 USB port and AC adapter. Then connect the AC Adapter to a power source.
Step 2: Register Your Account
1. To register your account, open the Welcome to Globalstar email from [email protected] and click on “Register Now”.
2. Follow the on-screen instructions to register your account.
3. Record your account login information for use in Step 3 of the “Setting up the Sat-Fi2 App”.[/vc_column_text][vc_column_text]Step 3: Setting up the Sat-Fi2 App
1. On your iOS or Android device, download and install the Sat-Fi2 App from either the Apple App Store or Google Play Store.
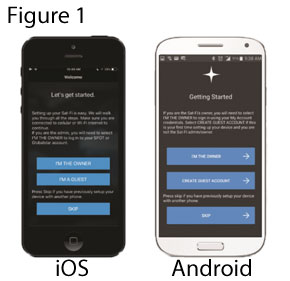
2. Ensure your device has a LTE or Wi-Fi connection and open the Sat-Fi2 App. The App will require the downloading of internal applications necessary for setup. Do not close the Sat-Fi2 App during this process.
3. A “Getting Started” screen will be displayed. Start the configuration process by selecting “I’m the Owner” and follow the on-screen instructions (Figure 1). This step will require your Sat-Fi2 My Account login information.
Wi-Fi and Password Information
- Default Sat-Fi Wi-Fi name: satfi2_ <xxxxxx> (where xxxxxx is the last 6 digits of the ICCID)
- Default Wi-Fi Password: satfi1234
- Default admin password: admin
[/vc_column_text][vc_column_text]STEP 4: Test the Sat-Fi2 Connection – Make a satellite call to test and confirm the Sat-Fi2 system is configured and operational.
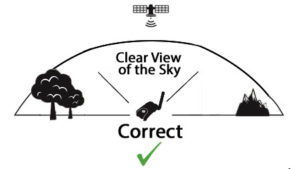
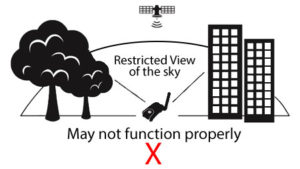
1. With your device fully charged, go outside where Sat-Fi2 has a 360° clear view of the sky with no obstructions (buildings, trees, etc.) and power on the Sat-Fi2 (see Figure 2 below). Ensure co-located antenna is fully extended in an upright position (see Figure 3 in the upper right column).
NOTE: The Sat-Fi2 can take up to 3 to 5 minutes to power on, boot up, and start establishing a satellite/gateway connection. The Satellite LED will blink RED until the smart device is connected to the Sat-Fi2 via Wi-Fi and the Sat-Fi2 is registered with a gateway.
2. Open the Sat-Fi2 App and verify that both the ![]() and
and ![]() icons are displayed on the Status Bar. If the icons are not displayed you may not have a clear view of the sky.
icons are displayed on the Status Bar. If the icons are not displayed you may not have a clear view of the sky.
3. In the Application Menu select ![]() .
.
4. Enter the telephone number you wish to call, or choose a contact, and select ![]() .[/vc_column_text][vc_column_text]
.[/vc_column_text][vc_column_text]
Figure 2 #
 [/vc_column_text][/vc_column][vc_column width=”1/2″][vc_column_text]
S.O.S. #
Important Notice: S.O.S. Mode Should Only Be Used During Life Threatening Emergencies. Sending False S.O.S. Messages May Subject You To Liability For Additional Charges.
Activate S.O.S. mode to begin communicating and sending alerts directly to GEOS International Emergency Response Coordination Center (IERCC). GEOS IERCC will notify the appropriate emergency responders based on the Sat-Fi2’s GPS location and your emergency situation. Responders may include local police, Coast Guard, or Search and Rescue teams. Please note that you may be liable for expenses related to your rescue if you have not purchased the optional Search & Rescue benefit. To learn more about GEOS Member Benefits, visit Globalstar.com/GEOS.
NOTE: Sat-Fi2 911/S.O.S. only applies within the designated Sat-Fi2 coverage area. For current coverage information, please feel free to contact us: Apollo Contact Info.[/vc_column_text][vc_column_text]
INITIATE S.O.S #
1. FROM THE DEVICE: Power on the Sat-Fi2, lift the protective S.O.S. cover and hold down the S.O.S. button until the S.O.S. LED blinks green (see Figure 3). 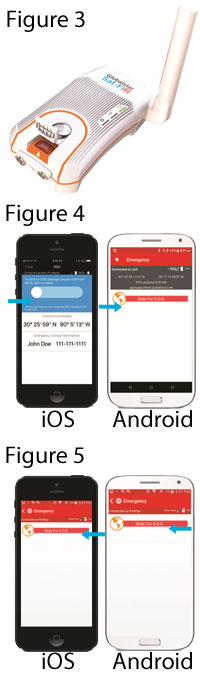
FROM THE APP: From the Sat-Fi2 App’s Home screen, select ![]() , slide the globe to the right and follow the on-screen instruction (see Figure 4).
, slide the globe to the right and follow the on-screen instruction (see Figure 4).
NOTE: While S.O.S. is active, the Sat-Fi2 must remain outside where it has a 360º clear view of the sky with no obstructions in order to maintain network connectivity.
2. Once S.O.S. is initiated and GEOS IERCC has received acknowledgment of your request, the Sat-Fi2 will continuously send S.O.S. notifications with your GPS position to GEOS IERCC every 5 minutes until S.O.S. is canceled or the Sat-Fi2 is powered off.
3. Sat-Fi2 will then enable you to talk or text with GEOS IERCC via the Sat-Fi2 App.
Cancel S.O.S. From The Device: Lift the protective S.O.S. cover and hold down the S.O.S. button until the S.O.S. LED blinks red.
From The App: From the Sat-Fi2 App’s S.O.S. screen, slide the globe to the left and follow the on-screens instructions (see Figure 5).
Important Note: The Sat-Fi2 will remain in S.O.S. mode until canceled by the user. The S.O.S. notification to GEOS will not be canceled if the device is powered off or if the Sat-Fi2 App is turned off.
[/vc_column_text][vc_column_text]
Lights #
| LED Status | Power LED | Satellite LED | S.O.S. LED |
| Power On | All green LEDs blink in forward/reverse direction until Sat-Fi2 powers on |
| Powered Off | Normal Blink Green | N/A | N/A |
Operational/Status #
| Powered On |
Normal Blink Green | N/A | N/A |
| Powered Off |
No LED | No LED | No LED |
| Battery Full |
Solid Green | N/A | N/A |
| Battery Charging |
Double Blink Green | N/A | N/A |
| Battery <25% | Fast Blink Red | N/A | N/A |
| Connected to Satellite |
N/A | Normal Blink Green | N/A |
| Not Connected to Satellite |
N/A | Normal Blink Red | N/A |
| S.O.S. Mode |
N/A | N/A | Normal Blink Green |
| Cancel S.O.S. Mode |
N/A | N/A | Normal Blink Red |
| Hibernation Mode |
Green & Orange (Brights/Dims/Off) |
No LED | No LED |
| Power Button |
Press the power button to turn the Sat-Fi2 on. The LEDs will light up notifying you that the device is on. |
Press and hold the power button down until all LEDs start flashing orange; the device will then power off. |
| S.O.S. Button |
Press and hold the S.O.S. button until the S.O.S. LED turns green to initiate an S.O.S. with GEOS IERCC. | While S.O.S. is active, press and hold the S.O.S. button until the S.O.S. LED turns red to cancel the S.O.S. with GEOS IERCC. |
| USB/Data Port |
Connect the USB Data/Power Cable to charge the battery and connect the Sat-Fi2 to a computer. |
Hibernation Mode #
As a default setting, the Sat-Fi2 will go into hibernation mode after 15 minutes of inactivity. The hibernation timer can be configured from the settings menu in the app or web console. When the Sat-Fi2 is in hibernation mode, the power LED performs a dimming blink in orange and green colors. To wake up the Sat-Fi2 from hibernation mode, access the app and a notification will be displayed showing that the Sat-Fi2 is waking up from hibernation. You will also see the green lights scrolling through the Sat-Fi2 LED’s. Additionally, pressing the power button for 3 seconds will start the power off sequence.
NOTE: To initiate S.O.S. while in hibernation mode, press and hold down the S.O.S. button until the LED’s start flashing. This will wake up the device and initiate S.O.S. once a connection has been established.[/vc_column_text][/vc_column][/vc_row][vc_row][vc_column][vc_separator][/vc_column][/vc_row][vc_row][vc_column][vc_single_image image=”14396″ img_size=”full” alignment=”center” onclick=”custom_link” img_link_target=”_blank” link=”https://apollosatellite.com/products/globalstar-sat-fi2-satellite-hotspot”][/vc_column][/vc_row][vc_row][vc_column][vc_separator][/vc_column][/vc_row][/vc_section][vc_section][vc_row][vc_column][vc_column_text]
Device Overview #
[/vc_column_text][vc_separator el_width=”30″][/vc_column][/vc_row][vc_row][vc_column][vc_single_image image=”14074″ img_size=”full” alignment=”center”][/vc_column][/vc_row][vc_row][vc_column][vc_separator color=”black” style=”dashed” el_width=”50″][/vc_column][/vc_row][vc_row][vc_column width=”1/2″][vc_single_image image=”14067″ img_size=”full” alignment=”center”][/vc_column][vc_column width=”1/2″][vc_single_image image=”14070″ img_size=”full” alignment=”center”][/vc_column][/vc_row][vc_row][vc_column][vc_separator color=”black” style=”dashed” el_width=”50″][/vc_column][/vc_row][vc_row][vc_column][vc_column_text]Additional Globalstar Sat-Fi2 Support
#
[/vc_column_text][vc_separator el_width=”30″][vc_column_text]
For more information on how to access your personal email, send an S.O.S., set up social media, check the weather, browse the web, check your voicemail and more detailed information on how to use your Globalstar Sat-Fi2, please contact Apollo SatCom: Apollo SatCom Contact Info.
[/vc_column_text][/vc_column][/vc_row][/vc_section]


